I have heard the opinion more than once that the TIE Advanced is the weakest ship in the game. My natural inclination is to question it and get to the bottom of why this opinion came into being.
Others have pointed out and shown that the TIE Advanced is supposed to be roughly equivalent of a X-Wing and if you judge it by its movement dial and stats to a degree it does make sense however I want to approach it from a different angle. Rather than judge it for its current inability to be used as a swarm or for any of its other perceived shortcomings I want to find some uses for it that might make you consider it in your lists.
Since it doesn't lend itself to being taken in a swarm of only TIE Advanced models I believe it's is used in more of a command ship style capacity. Almost like a support ship in a lot of ways. One way to use it that I thought of was the following for 35 points.
Maarek Steele with Cluster Missiles and Opportunist
Now Maarek seems to be a little confusing at first. This is a pilot ability that really wants to roll a lot of dice in order to insure that it has a chance to get used. Having 2 Attack dice base does not a recipe make for guaranteed crits. However his ship has a Missile Slot and with the introduction of Imperial Aces we have access to Opportunist. Suddenly he can roll a lot of dice and in this role could serve in an anti-swarm capacity.
This build could be added to a swarm list (5 Obsidian TIEs for instance) and because it is nearly the same number of hit points as another two TIEs the list doesn't lose much thanks to amount of firepower that build puts out. Also being Pilot Skill 7 doesn't hurt and if you can find 1 point you can easily add a Munitions Failsafe to insure you don't completely miss on your Cluster Missiles. I think there might be a place for running direct anti-swarm counters in a swarm list of your own.
In staying with that concept; I call this list I Have You Now! and it is 100 points.
Darth Vader with Expose and Shield Upgrade
Howlrunner with Swarm Tactics
Mauler Mithel with Swarm Tactics
x2 Academy TIE
Here we get Darth Vader who can reliably use Expose on thanks to having two actions. You can easily gain an Evade token and then use Expose so that you don't leave yourself in a vulnerable position. Vader is a bit more tanky as well thanks the addition of Shield Upgrade. Howrunner and Mauler run a mini-swarm with their own Swarm Tactics to help make sure those Academy TIEs get to fire. It is only five models but it has the hit points for six and that is pretty standard for an elite TIE swarm. Lastly you get some reliability when attacking thanks to Howlrunner and Vader potentially rolling 4 Attack
dice if he finds himself at Range 1.
I came up with another list that i've won a couple of games with that also utilizes Darth. I call it Darth's the Boss and it is 99 points.
Darth Vader with Squad Leader
Captain Jonus with Seismic Charges
x2 Gamma Squadron with Concussion Missiles
This list is designed to have an initial alpha strike with high reliability against a single target with the concussion missiles. Ideally you move the bombers up and focus, they move, you move everyone else up and use Darth to give the now in range target locks to the bombers. They then dump their missiles into a ship able to re-roll two dice out of four, change one blank to a hit and use a focus token if needed. You also have access to the Seismic Mine as well in order to help deal with swarms as well as to give you something to do it you get an ion turret. One damage is less of a big deal to a TIE bomber than it is to most other fighters. Darth is there essentially to maximize efficiency of the bombers every turn. The main downside is that the movement dial of the TIE Advanced isn't really compatible with the TIE Bombers and that you need to stay somewhat close together to take advantage of everything.
I think the TIE Advanced could use a small boost similar to the one the A-Wing is getting in Rebel Aces but I don't believe it is a bad ship. You do need to build your entire list around it but I think it could find a place for those who are looking for a bit of diversity or just thinking outside the box.
In this weeks The Wookie Won I show a list I created (that has likely been created elsewhere but it was new to me) called Synergy Smuggler for 100 points.
Dutch Vander with Blaster Turret, Hull Upgrade, and R5-D8
Garven Dreis with Hull Upgrade and R2-D2
Kyle Katarn with Blaster Turret, Hull Upgrade, Moldy Crow, and Recon Specialist
If you use this list the right way it can be surprisingly reliable. For the first two turns I only move 1 and bank focus on Kyle until we engage on Turn 3/4. Garven hangs back to jump on any ship that starts to close whereas Dutch and Kyle stay next to each other. It is pretty important to keep Garven close to the group to insure his ability works. Actions should be: Garven does Target Lock, Dutch does Target Lock and gives one to Kyle and Kyle does a Focus action. At the start of the Combat Phase Kyle gives Garven a Focus oken. At the start of the combat phase The activation order always goes: Garven attacks now having a Focus token and a Target Lock. He gives the Focus token to Dutch. Dutch attacks using his Focus and Target Lock. Then Kyle attacks with his focus and Target Lock. Ideally every turn all three ships can attack using Focus and Target Lock thus insuring that those three dice reliably put some hurt on whoever you are shooting.
Lastly a variant of the above list
Dutch Vander with Blaster Turret
Kyle Katarn with Blaster Turret, Moldy Crow, and Recon Specialist
x2 Rookie Pilots
It does seem to beef up the list in terms of raw firepower and I do like the addition of another model but you lose Garven's Focus manipulation ability.
We will return on Thursday!
Monday, March 31, 2014
Thursday, March 27, 2014
Battle Report - Imperial vs Rebel - 22 March 2014
Welcome to Rolling Blanks first battle report. Any suggestions about the format are appreciated as I am still trying to balance conciseness with readability. Also note there will be no The Wookie Won segment on battle report days.
Rebel (Will) 100 points (Won Initiative)
Ibitsam with Advanced Sensors
Dagger Squadron with Advanced Sensors
Chewbacca
Imperial (Michael) 100 points
Howlrunner with Stealth Device
Mauler Mithel
Backstabber
Dark Curse
Night Beast
Winged Gundark
Pre-Deployment Setup
Deployment


Turn 1
Movement
Dagger Squadron barrel roll then straight 3
Chewbacca straight 4 then target locked Night Beast
Winged Gundark straight 3 then focus
Night Beast straight 5 then focus
Ibitsam barrel roll the straight 3
Dark Curse straight 5 then focus
Backstabber straight 5 then focus
Mauler Mithel straight 4, hits asteroid, no damage
Howlrunner straight 3 then focus


Combat
Dark Curse @ Chewbacca [RNG 3] Roll: FF Used Focus New Result: HH
Defense Roll: E End Result: -1 Shield
Chewbacca @ Night Beast [RNG 3] Roll: FFB Used Focus New Result: HHB
Defense: EEB End Result: None
Night Beast @ Chewbacca [RNG 3] Roll: HB
Defense Roll: FB End Result -1 Shield
Backstabber @ Chewbacca [RNG 3] Roll: CF Used Focus New Result: CH
Defense Roll: EE End Result: None
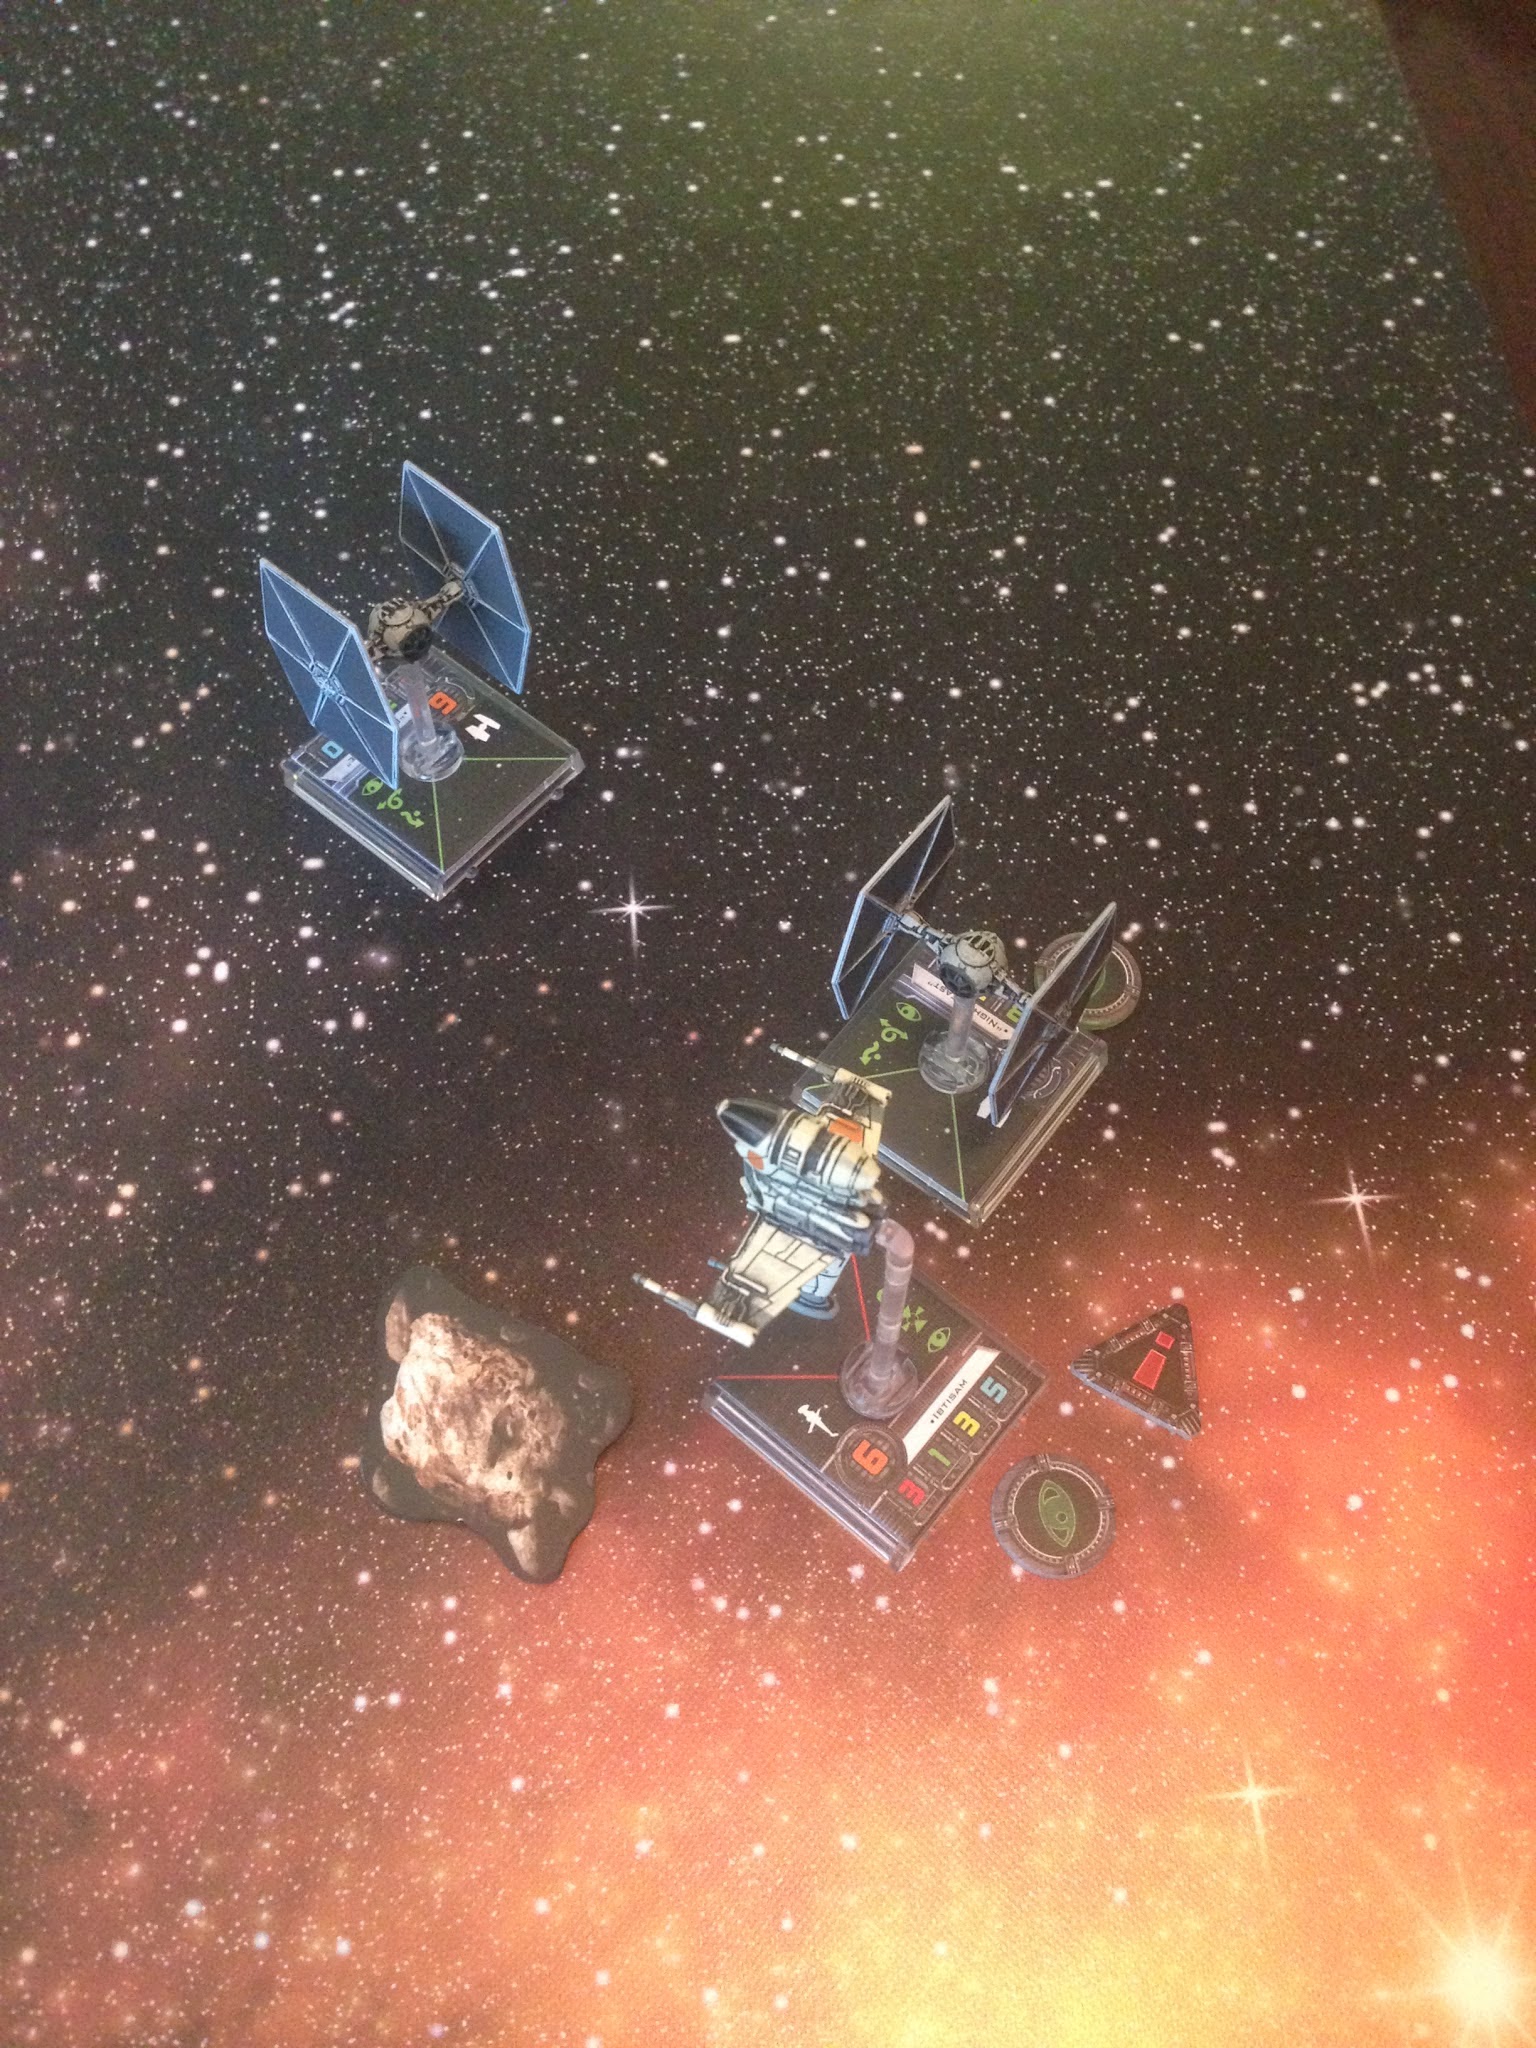
Summary: Chewbacca and the trio of TIE pilots got in range early and exchanged some long range pot shots which resulted in Chewbacca losing a couple of shields.
Turn 2
(Note: We were unsure if Night Beast got his focus if he performed a green maneuver which resulted in bump but we agreed to allow it for this game.)
Movement
Dagger squadron straight 2 then focus
Chewbacca straight 2 then target locked Backstabber
Winged Gundark straight 3 then focus
Night Beast straight 2, bumps Chewbacca, gains free focus
Ibitsam focus then bank 3, stressed
Dark Curse straight 3, bumps Chewbacca
Backstabber k-turn 4, stressed
Mauler Mithel straight 2 then focus
Howlrunner straight 3, hits asteroid, critical result of Thrust Control Fire, stressed


Combat
Howlrunner @ Dagger Squadron [RNG 1] Roll: HFF Used Focus New Result: HHH
Defense Roll: E End Result: -2 Shields
Mauler Mithel @ Dagger Squadron [RNG 1] Roll: HHFB Used Howlrunner Result: HHFB Used Focus Final Result: HHHB
Defense Roll: B End Result: -3 Shields
Ibitsam @ Night Beast [RNG 3] Roll: HBB Used Ability New Result: HBB
Defense Roll: EFFB End Result: None
Backstabber @ Chewbacca [RNG 1] Roll: HHHF
Defense Roll: B End Result: -3 Shields
Chewbacca @ Backstabber [RNG 1] Roll: HHFB Used Target Lock New Result: HHBB
Defense Roll: EFB End Result: -1 Damage
Winged Gundark @ Dagger Squadron [RNG 1] Roll: HFB Used Howlrunner New Result: HFF Used Focus Final Result: HHH
Defense Roll: B End Result: -2 Damage
Dagger Squadron @ Howlrunner [RNG 1] Roll: CHHH
Defense Roll: EFFF End Result: Howlrunner Destroyed
Summary: Howlrunner, Mauler Mithel, and Winged Gundark ganged up on the Dagger Squadron
B-Wing and nearly destroyed it. In retaliation it focused it fore on Howlrunner and in
spite of the Stealth Device destroyed her in an impressive volley. Backstabber swung
around and fired at point blank range taking down Chewbacca's shields. In response the
Chewbacca fired and managed to hit Backstabber in reply.
Turn 3
Movement
Dagger Squadron focus, turn 1, stressed
Chewbacca k-turn 3, stressed
Winged Gundark k-turn 4, stressed
Night Beast k-turn 4, stressed
Ibitsam bank 1, target lock Backstabber
Dark Curse k-turn 4, stressed
Backstabber straight 2, loses stress, focus
Mauler Mithel k-turn 4, stressed


Turn 11
Movement
[NO PICTURES TAKEN]
Combat
Ibitsam @ Night Beast [RNG 3] Roll: CHF Used Focus New Result: CHH
Defense Roll: EEE End Result: None
Dark Curse @ Ibitsam [RNG 1] Roll: FFB End Result: None
Night Beast @ Ibitsam [RNG 1] Roll: CB
Defense Roll: B Used Ability: New Result: E End Result: None
Summary: Some shooting exchanged but everyone managed to avoid taking any damage.
Turn 13
Movement
Night Beast bank 2, hits asteroid, crit result of Console Fire
Ibitsam straight 2, loses stress, bump Night Beast
Dark Curse turn 1, bump Ibitsam
Combat
None
Summary: Due to a traffic jam no one was able to come to work this turn. Night Beast does manage to set his controls on fire though in the second turn of the game where only the asteroid wins.
Turn 14
Movement
Night Beast bank 2, puts out Console Fire, free focus
Ibitsam focus, turn 2
Dark Curse k-turn 3, stress token


Combat
Dark Curse @ Ibitsam [RNG 2] Roll: FB End Result: None
Summary: Night Beast manages to put out the flames and Dark Curse misses Ibitsam.
Turn 15
Movement
Night Beast turn 1, focus
Ibitsam, focus, k-turn 2, stressed
Dark Curse straight 3, loses stress, barrel roll


Combat
Ibitsam @ Night Beast [RNG 1] Roll: CFBB Used Ability: New Result: CHFB Used Focus Final Result: CHHB
Defense Roll: FFB Used Focus New Result: EEB End Result: 1 Critical, critical result of Damaged Cockpit
Dark Curse @ Ibitsam [RNG 1] Roll: HHF
Defense Roll: E End Result: -1 Shield
Night Beast @ Ibitsam [RNG 1] Roll: BBH
Defense Roll: B Used Ability New Result: B End Result: -1 Shield
Summary: Ibitsam seeing that Night Beast needs some help with his cockpit decides to fire into it causing another crit. However both TIEs managed to land a bit of damage in return whittling down Ibitsam's shielding.
Turn 16
Movement
Night Beast k-turn 3, stressed, hits asteroid, no effect
Ibitsam, bank 1, loses stress, bump Dark Curse
Dark Curse k-turn 4, stressed
[NO PICTURES TAKEN]
Combat
Dark Curse @ Ibitsam [RNG 1] Roll: CBB
Defense Roll: B Used Ability New Result: B End Result: 1 Critical, critical result of Direct Hit
Night Beast @ Ibitsam [RNG 2] Roll: FB End Result: None
Summary: Dark Curse puts the hurt on Ibitsam and manages to shoot off some important looking part. Night Beast still cant see out the windshield and misses.
Turn 17
Movement
Night Beast bank 2, loses stress, hits asteroid, no effect, bumps Ibitsam, free focus
Ibitsam focus, k-turn 2, stressed
Dark Curse straight 2, loses stress, bump Night Beast
[NO PICTURES TAKEN]
Combat
Ibitsam @ Night Beast [RNG 2] CHF Used Ability New Result: CHH
Defense Roll: EBB End Result: Night Beast Destroyed
Dark Curse @ Ibitsam [RNG 2] Roll: HH
Defense Roll: E End Result: Ibitsam Destroyed
Summary: Ibitsam finally managed to pick off Night Beast but Dark Curse never took his eye off the prize and managed to eke out a win finally destroying Ibitsam.
Imperial Wins!
So ends our first battle report. Aside from missing the picture taking step a few times I think it went well as it was a balanced game that went down to the wire. See you all next week!
Rebel (Will) 100 points (Won Initiative)
Ibitsam with Advanced Sensors
Dagger Squadron with Advanced Sensors
Chewbacca
Imperial (Michael) 100 points
Howlrunner with Stealth Device
Mauler Mithel
Backstabber
Dark Curse
Night Beast
Winged Gundark
Pre-Deployment Setup
Deployment
Turn 1
Movement
Dagger Squadron barrel roll then straight 3
Chewbacca straight 4 then target locked Night Beast
Winged Gundark straight 3 then focus
Night Beast straight 5 then focus
Ibitsam barrel roll the straight 3
Dark Curse straight 5 then focus
Backstabber straight 5 then focus
Mauler Mithel straight 4, hits asteroid, no damage
Howlrunner straight 3 then focus
Combat
Dark Curse @ Chewbacca [RNG 3] Roll: FF Used Focus New Result: HH
Defense Roll: E End Result: -1 Shield
Chewbacca @ Night Beast [RNG 3] Roll: FFB Used Focus New Result: HHB
Defense: EEB End Result: None
Night Beast @ Chewbacca [RNG 3] Roll: HB
Defense Roll: FB End Result -1 Shield
Backstabber @ Chewbacca [RNG 3] Roll: CF Used Focus New Result: CH
Defense Roll: EE End Result: None
Summary: Chewbacca and the trio of TIE pilots got in range early and exchanged some long range pot shots which resulted in Chewbacca losing a couple of shields.
Turn 2
(Note: We were unsure if Night Beast got his focus if he performed a green maneuver which resulted in bump but we agreed to allow it for this game.)
Movement
Dagger squadron straight 2 then focus
Chewbacca straight 2 then target locked Backstabber
Winged Gundark straight 3 then focus
Night Beast straight 2, bumps Chewbacca, gains free focus
Ibitsam focus then bank 3, stressed
Dark Curse straight 3, bumps Chewbacca
Backstabber k-turn 4, stressed
Mauler Mithel straight 2 then focus
Howlrunner straight 3, hits asteroid, critical result of Thrust Control Fire, stressed
Combat
Howlrunner @ Dagger Squadron [RNG 1] Roll: HFF Used Focus New Result: HHH
Defense Roll: E End Result: -2 Shields
Mauler Mithel @ Dagger Squadron [RNG 1] Roll: HHFB Used Howlrunner Result: HHFB Used Focus Final Result: HHHB
Defense Roll: B End Result: -3 Shields
Ibitsam @ Night Beast [RNG 3] Roll: HBB Used Ability New Result: HBB
Defense Roll: EFFB End Result: None
Backstabber @ Chewbacca [RNG 1] Roll: HHHF
Defense Roll: B End Result: -3 Shields
Chewbacca @ Backstabber [RNG 1] Roll: HHFB Used Target Lock New Result: HHBB
Defense Roll: EFB End Result: -1 Damage
Winged Gundark @ Dagger Squadron [RNG 1] Roll: HFB Used Howlrunner New Result: HFF Used Focus Final Result: HHH
Defense Roll: B End Result: -2 Damage
Dagger Squadron @ Howlrunner [RNG 1] Roll: CHHH
Defense Roll: EFFF End Result: Howlrunner Destroyed
Summary: Howlrunner, Mauler Mithel, and Winged Gundark ganged up on the Dagger Squadron
B-Wing and nearly destroyed it. In retaliation it focused it fore on Howlrunner and in
spite of the Stealth Device destroyed her in an impressive volley. Backstabber swung
around and fired at point blank range taking down Chewbacca's shields. In response the
Chewbacca fired and managed to hit Backstabber in reply.
Turn 3
Movement
Dagger Squadron focus, turn 1, stressed
Chewbacca k-turn 3, stressed
Winged Gundark k-turn 4, stressed
Night Beast k-turn 4, stressed
Ibitsam bank 1, target lock Backstabber
Dark Curse k-turn 4, stressed
Backstabber straight 2, loses stress, focus
Mauler Mithel k-turn 4, stressed
Combat
Mauler Mithel @ Dagger Squadron [RNG 1] Roll: CHHH
Defense Roll: E End Result: Dagger Squadron Destroyed
Ibitsam @ Backstabber [RNG 2] Roll: HHF Used Target Lock New Result: CHH
Defense Roll: EBB End Result: 1 Critical, 1 Damage, critical result of Direct Hit
Backstabber @ Chewbacca [RNG 1] CHH
Defense Roll: B End Result: 1 Critical, 2 Damage, critical result of Injured Pilot
Backstabber Destroyed
Chewbacca @ Night Beast [RNG 3] Roll: FBB End Result: None
Night Beast @ Chewbacca [RNG 3] Roll: FB End Result: None
Dark Curse @ Ibitsam [RNG 2] Roll: BB End Result: None
Winged Gundark @ Ibitsam [RNG 2] Roll: HF
Defense Roll: E End Result: None
Summary: Mauler Mithel gained vengence for the loss of Howlrunner by immediately
destroying the Dagger Squadron B-Wing. Ibitsam pursued Backstabber and destroyed him in
a single volley. However Backstabber being of equal pilot skill got to unleash one final
attack into Chewbacca doing an impressive three damage.
Turn 4
Movement
Chewbacca straight 1, loses stress, target lock Night Beast
Winged Gundark turn 2, keeps stress
Night Beast straight 2, loses stress, evade, free focus
Ibitsam barrel roll, k-turn 2, stressed
Dark Curse straight 2, focus
Mauler Mithel bank 3, keeps stress
Combat
Mauler Mithel @ Chewbacca [RNG 2] Roll: BB End Result: None
Ibitsam @ Winged Gundark [RNG 2] Roll: CHB, Used Ability, New Result: CHH
Defense Roll: FBB End Result: Winged Gundark Destroyed
Dark Curse @ Chewbacca [RNG 1] Roll: BBB End Result: None
Chewbacca @ Night Beast [RNG 1] Roll: HFFF Used Target Lock New Result: CHHF
Defense Roll: EEB Used Evade New Result: EEEB End Result: None
Night Beast @ Chewbacca [RNG 1] Roll: HBB
Defense Roll: F End Result: -1 Damage
Summary: Ibitsam now turned his attention on Winged Gundark and destroyed him before he
could get another shot off. Chewbacca went after Night Beast who barely evaded the
onslaught. In reply Night Beast shot back at Chewbacca managing to do a bit of damage.
Turn 5
Movement
Chewbacca, k-turn 4, stressed
Night Beast k-turn 3, stressed
Ibitsam turn 2, stressed
Dark Curse k-turn 3, stressed
Mauler Mithel bank 3, loses stress, hits asteroid, 1 damage
Combat
Mauler Mithel @ Ibitsam [RNG 1] Roll: HFFF
Defense Roll: F Used Ability New Result: E End Result: None
Ibitsam @ Mauler Mithel [RNG 1] Roll: CFBB, Used Ability, New Result: CHFB
Defense Roll: EEB End Result: None
Dark Curse @ Ibitsam [RNG 2] Roll: HF
Defense Roll: E End Result: None
Chewbacca @ Mauler Mithel [RNG 2] Roll: CHH
Defense Roll: EEE End Result: None
Night Beast @ Ibitsam [RNG 2] Roll: FB End Result: None
Summary: Lots of shooting and no damage. The only winner this round was the asteroid
which managed to do a bit of damage to Mauler Mithel.
Turn 6
Movement
Chewbacca, straight 2, loses stress, bumps Ibitsam
Night Beast straight 2, loses stress, evade and free focus
Ibitsam straight 2, loses stress, barrel roll
Dark Curse straight 2, loses stress, focus
Mauler Mithel bank 3, bump Dark Curse
Combat
Mauler Mithel @ Chewbacca [RNG 1] Roll: CHHB
Defense Roll: B End Result: 1 Critical, 2 Damage, critical result of Damaged Cockpit, ignored
Dark Curse @ Chewbacca [RNG 1] Roll: CCF Used Focus New Result: CCH
Defense Roll: B End Result: Chewbacca Destroyed
Summary: Mauler Mithel and Dark Curse focused on Chewbacca finally taking him down.
Turn 7
Movement
Night Beast k-turn 3, stressed
Ibitsam focus, turn 2, stressed
Dark Curse k-turn 3, stressed
Mauler Mithel turn 1, focus
Combat
None
Summary: Ibitsam flies into the asteroids to put some distance between himself and the
remainder of the TIE fighters.
Turn 8
Movement
Night Beast bank 3, keeps stress
Ibitsam straight 2, loses stress, focus
Dark Curse bank 3, stressed, bumps Night Beast
Mauler Mithel turn 1, focus
Combat
Mauler Mithel @ Ibitsam [RNG 3] Roll: BB End Result: None
Night Beast @ Ibitsam [RNG 3] Roll: FB End Result: None
Summary: A few stray potshots are taken at Ibitsam to no effect.
Turn 9
Movement
Night Beast straight 2, loses stress, evade, free focus
Ibitsam barrel roll, k-turn 2, stressed
Dark Curse bank 2, loses stress, barrel roll
Mauler Mithel bank 2, focus
Combat
Mauler Mithel @ Ibitsam [RNG 3] FB Used Focus New Result: HB
Defense Roll: EB End Result: None
Ibitsam @ Mauler Mithel [RNG 3] HHB Used Ability New Result: CHH
Defense Roll: FBBB End Result: Mauler Mithel Destroyed
Dark Curse @ Ibitsam [RNG 3] HF
Defense Roll: BB Used Ability New Result: BF End Result: -1 Shield
Summary: Mauler Mithel attempted to take a long range shot at Ibitsam who had the same
idea. Mauler completely missed whereas Ibitsam hit critically destroying Mauler Mithel.
Dark Curse also took a potshot and managed to knock down a shield.
Turn 10
Movement
Night Beast bank 2, evade, free focus
Ibitsam bank 1, barrel roll
Dark Curse focus, bank 2, bump Ibitsam
Combat
Ibitsam @ Night Beast [RNG 2] Roll: HHBB
Defense Roll: EEB End Result: None
Summary: Ibitsam tried to put the hurt on Night Beast but he managed to avoid the pain.
Turn 11
Movement
Night Beast bank 2, evade, free focus
Ibitsam bank 1, barrel roll
Dark Curse bank 2, bump Ibitsam
Combat
Night Beast @ Ibitsam [RNG 3] Roll: HB
Defense Roll: FFB Used Focus New Result: EEB End Result: None
Summary: A wild shot is easily dodged by Ibitsam.
Turn 12
Movement
Combat
Night Beast @ Ibitsam [RNG 3] Roll: HB
Defense Roll: FFB Used Focus New Result: EEB End Result: None
Summary: A wild shot is easily dodged by Ibitsam.
Turn 12
Movement
Night Beast bank 3, bump Dark Curse, free focus
Ibitsam focus, k-turn 2, stressed
Dark Curse bank 2, barrel roll
Combat
Ibitsam @ Night Beast [RNG 3] Roll: CHF Used Focus New Result: CHH
Defense Roll: EEE End Result: None
Dark Curse @ Ibitsam [RNG 1] Roll: FFB End Result: None
Night Beast @ Ibitsam [RNG 1] Roll: CB
Defense Roll: B Used Ability: New Result: E End Result: None
Summary: Some shooting exchanged but everyone managed to avoid taking any damage.
Turn 13
Movement
Night Beast bank 2, hits asteroid, crit result of Console Fire
Ibitsam straight 2, loses stress, bump Night Beast
Dark Curse turn 1, bump Ibitsam
Combat
None
Summary: Due to a traffic jam no one was able to come to work this turn. Night Beast does manage to set his controls on fire though in the second turn of the game where only the asteroid wins.
Turn 14
Movement
Night Beast bank 2, puts out Console Fire, free focus
Ibitsam focus, turn 2
Dark Curse k-turn 3, stress token
Combat
Dark Curse @ Ibitsam [RNG 2] Roll: FB End Result: None
Summary: Night Beast manages to put out the flames and Dark Curse misses Ibitsam.
Turn 15
Movement
Night Beast turn 1, focus
Ibitsam, focus, k-turn 2, stressed
Dark Curse straight 3, loses stress, barrel roll
Combat
Ibitsam @ Night Beast [RNG 1] Roll: CFBB Used Ability: New Result: CHFB Used Focus Final Result: CHHB
Defense Roll: FFB Used Focus New Result: EEB End Result: 1 Critical, critical result of Damaged Cockpit
Dark Curse @ Ibitsam [RNG 1] Roll: HHF
Defense Roll: E End Result: -1 Shield
Night Beast @ Ibitsam [RNG 1] Roll: BBH
Defense Roll: B Used Ability New Result: B End Result: -1 Shield
Summary: Ibitsam seeing that Night Beast needs some help with his cockpit decides to fire into it causing another crit. However both TIEs managed to land a bit of damage in return whittling down Ibitsam's shielding.
Turn 16
Movement
Night Beast k-turn 3, stressed, hits asteroid, no effect
Ibitsam, bank 1, loses stress, bump Dark Curse
Dark Curse k-turn 4, stressed
Combat
Dark Curse @ Ibitsam [RNG 1] Roll: CBB
Defense Roll: B Used Ability New Result: B End Result: 1 Critical, critical result of Direct Hit
Night Beast @ Ibitsam [RNG 2] Roll: FB End Result: None
Summary: Dark Curse puts the hurt on Ibitsam and manages to shoot off some important looking part. Night Beast still cant see out the windshield and misses.
Turn 17
Movement
Night Beast bank 2, loses stress, hits asteroid, no effect, bumps Ibitsam, free focus
Ibitsam focus, k-turn 2, stressed
Dark Curse straight 2, loses stress, bump Night Beast
[NO PICTURES TAKEN]
Combat
Ibitsam @ Night Beast [RNG 2] CHF Used Ability New Result: CHH
Defense Roll: EBB End Result: Night Beast Destroyed
Dark Curse @ Ibitsam [RNG 2] Roll: HH
Defense Roll: E End Result: Ibitsam Destroyed
Summary: Ibitsam finally managed to pick off Night Beast but Dark Curse never took his eye off the prize and managed to eke out a win finally destroying Ibitsam.
Imperial Wins!
So ends our first battle report. Aside from missing the picture taking step a few times I think it went well as it was a balanced game that went down to the wire. See you all next week!
Monday, March 24, 2014
TIE Bomber Teardown
The TIE Bomber serves an interesting role for the Imperial faction. At first glance it isn't clear what it's role should be although it is the cheapest missile platform available for the Imperials. It also has double the hit points of a TIE Fighter for only four more points. That alone should make it interesting. It does lose a point of Agility and trades Evade for Target Lock but it can field any ordinance you can imagine and has more staying power. There are few different ways to use it.
Note: There is a card coming out which will improve the reliability of all secondary weapons called Munitions Failsafe. I am aware of its upcoming existence but my play tests did not use it so it is not factored into this article though I believe it could only be considered an improvement.
The first way to use it is as a supplementary cruise missile. Which is to say you are taking it so that it can unload its munition and then you expect it die quickly thereafter. When used in this way I would advise taking a single Assault Missiles (for anti-swarm) or Homing Missiles upgrade. I have found it is very difficult to set up more than one shot in a game and having five or more points go unused is simply too great a risk to take. For 21 points in either configuration it is reasonable to assume you put the hurt on your intended target(s) and it represents direct in-faction anti-swarm tech for a very reasonable points cost.
The second way is to build your entire list around it. In my introduction post I presented a bomber list that I had been play testing with. Here is a different one that is even more aggressive and specifically designed to help bring down Rebel lists with three or four models.
Bomber Strike Wing 100 points
Colonel Jendon with Fire Control System and ST-321
Captain Jonus with x1 Homing Missiles
x2 Scimitar Squadron with x1 Homing Missiles
In this list it is very important that you start at your board edge and do your best to move as little as possible for two turns to maximize use of giving away your target locks to your bombers. Then on Turn 3 position yourself and perform an alpha strike on your target of choice. If you have done it correctly you should be able to fire all three of your Homing Missiles with Jonus letting you reroll two dice per attack on your Scimitar models and with those two Scimitar models having focused that turn to insure maximum output. With one of their ships down you should now outnumber them but that only makes it even as your firepower is now greatly reduced. It is then important to focus carefully as don't have as much firepower as a swarm would. Jendon becomes very important in this scenario as he is your main source of firepower as well as still being able to issue Target Locks to the rest of the bombers to improve reliability.
The last way to use them is a theoretical I have not seen done but would like to see or may do myself if I can find someone out there who has three TIE Bombers to let me use is to run them as a swarm. While you lose on some of the TIE fighters maneuverability and Agility 3 you do have 36 Hull points of damage for them to chew through and Target Locks to help improve your shooting reliability. It may be a tragically bad idea but I believe it is the tankiest build you can currently make in the game.
TIE Bomber Swarm 100 points
x4 Scimitar Squadron
x2 Gamma Squadron
This weeks The Wookie Won is a cool list that I have played against and had an opportunity to try as well that features the Firespray-31 which I don't see enough of. While I use a variation of this list I am posting the original I fought against here. It was quite effective at taking apart my XXBA list.
Firesprays & Doomshuttle 100 points.
Omicron Group Pilot with Darth Vader
x2 Bounty Hunter with Recon Specialist and Seismic Charge
Aside from the overall tankiness of this list it gets a great deal of action efficiency from the Recon Specialists. The Seismic Charge is is very useful both in an anti-swarm capacity and also for helping to control space behind your rear arc. The Doomshuttle is a common build that takes an Omicron and makes it a threat by adding Vader who can cause crits on unshielded ships as well as offering a last ditch opportunity to do some damage before the shuttle blows up if you are low on hit points.
Go forth and crush the puny Rebellion and we will return on Thursday.
Friday, March 21, 2014
An Introduction
First off I would like to thank the person who designed the shirt that my blog background came from. I found the shirt on Awesomer.com but I could not find the artist. So if you are out there please email me and I will give you credit here.
I play both factions and I play a lot of games. I lean towards Imperial but its mostly because I want it to be represented in my local meta which seems fairly Rebel oriented.
It is my intention to update this blog at least twice weekly starting next week. I have prewritten articles prepared so I will do my best to keep this commitment.
A disclaimer: this entire site is my opinion. There is no right and wrong and I am not looking to argue my points or battle the internet for non-existent supremacy. Agree or disagree we all play the same game and are here to have a good time which is all that matters in the end.
Now that the formalities are out of the way I would like to start things off by bringing up a list I play tested and an interesting build for Boba Fett I played against.
The list was 99 points and consisted of
Colonel Jendon with ST-321, Engine Upgrade, and Weapons Engineer
x3 Scimitar Squadron with x1 Homing Missiles
The idea is pretty simple. Move slowly for the first two turns and get early target locks populated on your Bombers. Then move your Bomber wave in for an alpha strike, take out one of their ships and then attempt to take out the remaining ships with careful focus firing and depending on the lists inherent tankiness.
The downsides are it is vulnerable to ion cannons especially if you get a stress token. Once locked down the Bomber is virtually doomed due to its 2 agility and lack of shields. If you miss your alpha strike you are also in a great deal of trouble. The list screams for Captain Jonus but you really need those guaranteed Target Locks more. In addition it is very helpful to be able to Focus or Barrel Roll as needed.
Something I've noticed is that the TIE Bomber is much more maneuverable than people seem to think it is. It has a 3 and 5 K-Turn on its dial. This generally means long strafing runs. I find it easy to run circles around Y-Wings and B-Wings and it is roughly as maneuverable as an X-Wing. But unlike an X-Wing it is very vulnerable to crits and its fire output is only 2 attack dice. So coming back from a slump can be very challenging.
The only other thing worth bringing up is the Engine Upgrade on the Lambda. It feels expensive but this is a huge benefit in the long run. After the target locks have been handed out you really want to make use of those 3 attack dice. This means overcoming the lack of maneuverability on the dial and the ability to Boost helps nicely with that.
To wrap things up I'm starting a new segment called The Wookie Won where I will showcase an interesting build or list I've heard about or seen played. For our first segment give this build a try and see if you can find a new respect for everyone's favorite hired gun.
Boba Fett - The Most Feared Bounty Hunter in the Galaxy 50 points
Boba Fett with Engine Upgrade, Navigator, and Opportunist
This build means you can be unpredictable with your movement have the ability to change headings or changing the distance of your movement using either Boba's ability or the Navigators. Then using the Boost action you can put yourself in perfect position to take advantage of a target that doesn't have a Focus or Evade token to get up to 5 Attack dice at Range 1. For the same points Expose is also an option if you don't mind losing a point of Agility.
Subscribe to:
Comments (Atom)