I now have had an opportunity to play all of the named TIE Interceptor pilots. Here are my thoughts on each one.
"Fel's Wrath" - Everyone's favorite zombie pilot. He is difficult to use well in my opinion. His ability essentially insures he will get to take his attack before exploding but I have yet to see an instance where it has made a significant difference in a game. He is also not an Elite Pilot thus further limiting him. But you could use him as a budget tank to soak fire knowing that you will always have an opportunity to attack with him. In my opinion he pays 1 point to lose 1 point of Pilot Skill in exchange for a Pilot Ability which is a positive trade in my opinion.
Summary Opinion: Worth it only if you are already taking Royal Guard Pilots and you do not need the Elite Pilot Skill.
Lt. Lorrir - His ability is powerful but very situational. Also the cost of a stress token is a tough price to pay. But he can be unpredictable and I am a fan of any ability on an Interceptor that increases its movement options. He is not an Elite Pilot but I don't feel he really needs it. Like "Fels Wrath" I feel he is paying 1 point to lose 1 point of Pilot Skill in exchange for a Pilot Ability which is a positive trade in my opinion.
Summary Opinion: Worth it only if you are already taking Royal Guard Pilots and you do not need the Elite Pilot Skill or are a big fan of unpredictable movement.
Kir Kanos - His ability will work often if you are careful to plan for it. I like Evade tokens and the fact he is Pilot Skill 6 actually helps him with his ability. He can wait to see what higher pilot skill pilots are going to do then he can choose to burn his token or to keep it if he feels he will need it. I also believe his ability is one of the only automatic hits in the game. The ability to simply insure you will do 1 damage is tremendously reliable. He lacks an Elite Pilot ability but I don't feel needs it.
Summary Opinion: Worth taking if you want reliable damage and you are reasonably sure you will be facing high Pilot skill models.
Tetran Cowell - His ability is interesting. Like "Fels Wrath" I believe he is hard to use well. But his ability is much more proactive and you do get an element of unpredictability from him. Also his Pilot Skill is 7 which is significant. Also he an Elite Pilot which is never a bad thing especially given the maneuver friendly Elite Pilot Skills which exist.
Summary Opinion: Worth taking if you are big fan of unpredictable movement. Has possible synergy with Lt. Lorrir.
Turr Phennir - Amazeballs. Easily my favorite of the named TIE Interceptor pilots. For starters he has Pilot Skill 7 as well as being an Elite Pilot. Then he has one of the only abilities in the game which allows him to move after shooting. Which lets him do drivebys. He can close to near point blank range, attack with 4 Attack dice, and then Boost or Barrel Roll out of opposing enemies arcs. I am not a fan of giving him any Action based Elite Pilot Skill and think he is well served by taking Veteran Instincts or Opportunist as both of these abilities are passive and leave his actions free,
Summary Opinion: Amazing. If you are looking for a late game Interceptor this should definitely be on your short list.
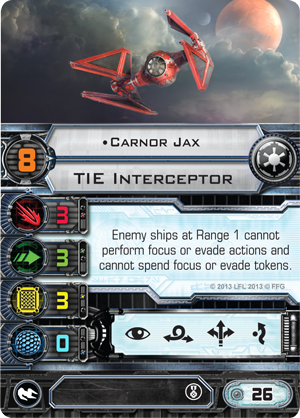
Carnor Jax - Very interesting but I have never seen him used effectively. While keeping your opponent from getting the value from certain actions does sound great in execution it is hard to get an appropriate amount of milage from this ability in the sense that you must be within Range 1 to use it and Interceptors aren't meant to knife fight. They are meant to make single passes with long sweeps and flank. So the ability is useful but runs counter to one of the core Interceptor play philosophies and is far too expensive for a suicide run.
Summary Opinion: Not sure where he fits in and so I would prefer to take Turr or Soontir who are in the same price range.
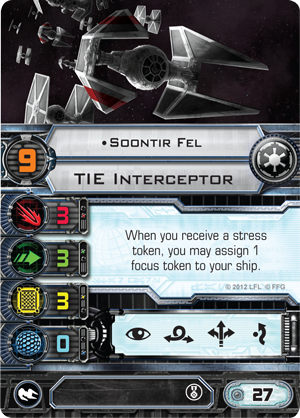
Soontir Fel - Second favorite and definitely one of the most popular choices. Both he and Turr are late game closers who can realistically take on whats left of your opponents force after the decisive mid game turns have played out. His ability adds a great deal of consistency and with the appearance of Hobbie and R3-A2 seems to have even more of an edge in countering some of the new Stress tech in the meta.
Summary Opinion: For your late game Interceptor you should consider Soontir very carefully among your available options.
75x75 - TIE Swarm (75 points)
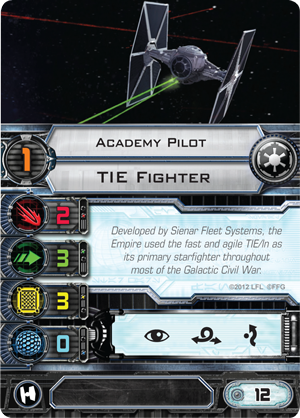
x3 Academy Pilot
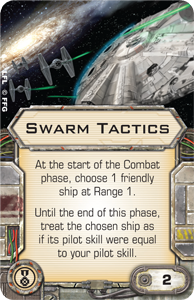
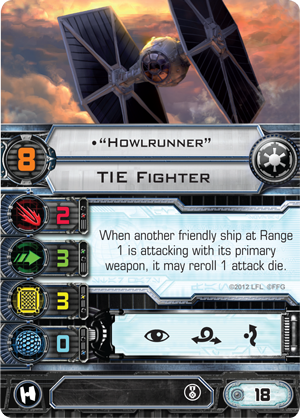
x1 Howlrunner with Swarm Tactics
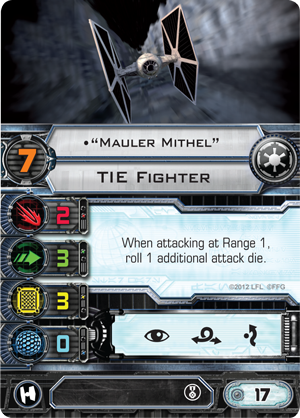
x1 Mauler Mithel with Swarm Tactics
This is pretty much a perfect Imperial list for the event and has a great combination of bodies as well as firepower. Also it should outnumber almost every other list there. I fukly expect to see at least one person run this on Saturday.
See you again on Thursday when I preview the custom painted A-Wing in the prize pool on Saturdays event.
Tuesday, May 13, 2014
Thursday, May 8, 2014
Rolling Blanks Tournament Prize Reveal 1 of 2 & Tournament Philosophy
So next Saturday is the big event so as it draws near I wanted to preview one of the two custom painted models that will be in the prize pool. The first is a crimson TIE fighter.


Next week I will also preview the custom painted A-Wing.
Now I wanted to talk a little bit about why I chose 75 points for my tournament. I know its not a standard total and that is actually part of the reason. I wanted to shake up conventional thinking and make people think outside the box a little. Also 75 point games go a little faster and also tend to favor smaller ships to an extent. Lastly it is a little easier for newer players to round up the requisite number of ships in order to participate. This design philosophy called out to me as beneficial. We will see how it works in execution.
75x75 - XXA 75 points
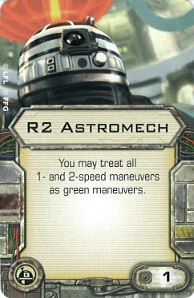
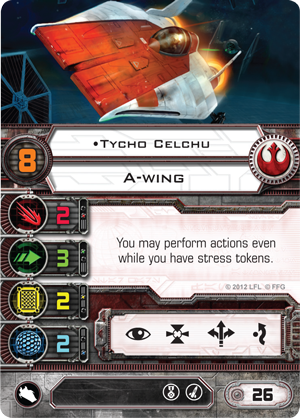
x2 Red Squadron Pilot with R2 Astromech
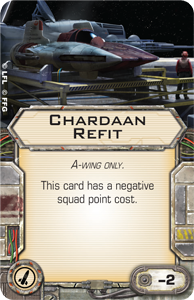
A very straight forward list with better than average Pilot Skill, survivability, and firepower. Tycho is the star of this list and should attempt to flank and harass as much as possible while staying out of enemy fire arcs. With Refit he is only 3 more points than his X-Wing counterparts and with good flying should be able to be a serious thorn in the side of your opponent.
See you all next week!
Tuesday, May 6, 2014
Event Summary - Game Kastle Fremont 05/05/14
I had the good luck of participating in the X-Wing Tournament at Game Kastle Fremont on Sunday. It was a very well run event and I really appreciated everything happening on time. I went 1-2 and the list I ran was 100 points:
Krassis with Heavy Laser Cannon, Recon Specialist, and Seismic Charges
x4 Obsidian Squadron Pilots
My first opponent had a list at 99 points:
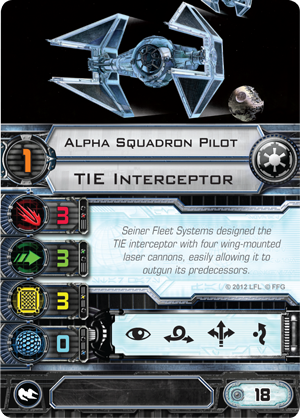
x2 Alpha Squadron Pilot
x2 Academy TIE
Mauler Mithel with Swarm Tactics
Howlrunner with Swarm Tactics
It was a strong list. I only managed to take out the Interceptors and bring Howlrunner down to 1 Hull before time was called. He had managed to kill everything but a single Obsidian TIE on my side. Nothing was out of my favor in terms of dice luck but I was a bit aggressive with my Firespray and he ended up with a pair of Direct Hits on him which ended his attack run a turn sooner than I had expected. Also Howlrunner shot out an Obsidian TIE in a single shot which was pretty rough.
My second opponent was a friend of mine who I have played many times. It was my only win. His list was 100 points:
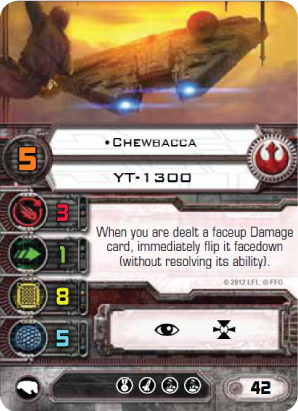
Chewbacca
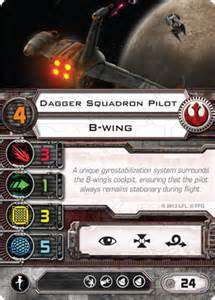
Dagger Squadron Pilot with Advanced Sensors
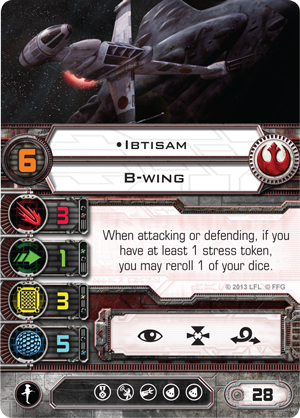
Ibitsam with Push the Limit
It was an extremely close game. He had managed to knock down three Obsidian TIEs and I only took out Chewbacca. I won by 3 points. No major mistakes this game though I could have been a bit more aggressive with my Firespray but I was still gun shy after the first game.
My final opponent had a list which was 99 points:
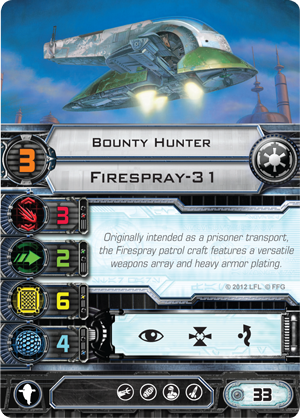
x3 Bounty Hunter
He ended up with initiative and the rock placement was pretty aggressive for both of us. However in the end I could not summon enough dice to take out more than one Firespray. I did have another down to 4 Hull but he had taken out Krassis as well as an Obsidian TIE.
Overall I felt I have improved a bit over my last tournament showing. However my list was not very strong in execution and I did make some mistakes which further hindered me. Krassis is okay but honestly I don't think the HLC or his ability are very good on the Firespray chassis. Most battles end up as close range knife fights anyway. A Bounty Hunter with a Recon Specialist would have done as well in my opinion. Furthermore the Seismic Chartges were entirely useless. I also did not get as much mileage out of my Obsidian TIEs as I had hoped. It only became relevant in one game and that was the first one. I believe I could have gotten the same performance from Academy TIES.
In retrospect I missed Howlrunner and should have adjusted things in order to take her. Based on what I saw at the tournament this is what I should have taken at 99 points:
x2 Academy TIE
Bounty Hunter with Recon Specialist
Mauler Mithel with Swarm Tactics
Howlrunner with Swarm Tactics
This has just about the same amount of firepower but now has pilots who are able to fire at Pilot Skill 8 and 7. Mauler is very dangerous at Range 1 and you keep the Firespray for support and hit points.
75x75 - Mini Elite Wing (75 points)
Backstabber
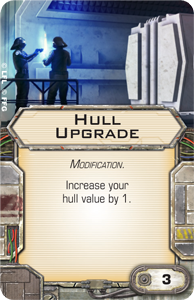
Howlrunner with Hull Upgrade and Swarm Tactics
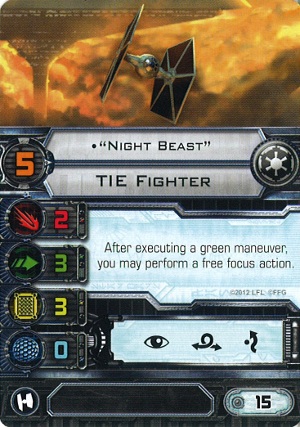
Night Beast
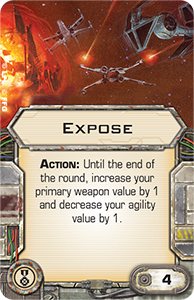
Mauler Mithel with Expose
This list has a nice range of higher than average Pilot Skills in conjunction with Howlrunner to let Night Beast fire at above his pay grade. Hull Upgrade also should buy her a little bit of time as she is commonly focused first. Mauler is deadly at Range 1 especially with Expose and poses a threat to one shot an unlucky ship. Backstabber is also no slouch. I like the combination of threats that this list poses.
See you all on Thursday!
Krassis with Heavy Laser Cannon, Recon Specialist, and Seismic Charges
x4 Obsidian Squadron Pilots
My first opponent had a list at 99 points:
x2 Alpha Squadron Pilot
x2 Academy TIE
Mauler Mithel with Swarm Tactics
Howlrunner with Swarm Tactics
It was a strong list. I only managed to take out the Interceptors and bring Howlrunner down to 1 Hull before time was called. He had managed to kill everything but a single Obsidian TIE on my side. Nothing was out of my favor in terms of dice luck but I was a bit aggressive with my Firespray and he ended up with a pair of Direct Hits on him which ended his attack run a turn sooner than I had expected. Also Howlrunner shot out an Obsidian TIE in a single shot which was pretty rough.
My second opponent was a friend of mine who I have played many times. It was my only win. His list was 100 points:
Chewbacca
Dagger Squadron Pilot with Advanced Sensors
Ibitsam with Push the Limit
It was an extremely close game. He had managed to knock down three Obsidian TIEs and I only took out Chewbacca. I won by 3 points. No major mistakes this game though I could have been a bit more aggressive with my Firespray but I was still gun shy after the first game.
My final opponent had a list which was 99 points:
x3 Bounty Hunter
He ended up with initiative and the rock placement was pretty aggressive for both of us. However in the end I could not summon enough dice to take out more than one Firespray. I did have another down to 4 Hull but he had taken out Krassis as well as an Obsidian TIE.
Overall I felt I have improved a bit over my last tournament showing. However my list was not very strong in execution and I did make some mistakes which further hindered me. Krassis is okay but honestly I don't think the HLC or his ability are very good on the Firespray chassis. Most battles end up as close range knife fights anyway. A Bounty Hunter with a Recon Specialist would have done as well in my opinion. Furthermore the Seismic Chartges were entirely useless. I also did not get as much mileage out of my Obsidian TIEs as I had hoped. It only became relevant in one game and that was the first one. I believe I could have gotten the same performance from Academy TIES.
In retrospect I missed Howlrunner and should have adjusted things in order to take her. Based on what I saw at the tournament this is what I should have taken at 99 points:
x2 Academy TIE
Bounty Hunter with Recon Specialist
Mauler Mithel with Swarm Tactics
Howlrunner with Swarm Tactics
This has just about the same amount of firepower but now has pilots who are able to fire at Pilot Skill 8 and 7. Mauler is very dangerous at Range 1 and you keep the Firespray for support and hit points.
75x75 - Mini Elite Wing (75 points)
Backstabber
Howlrunner with Hull Upgrade and Swarm Tactics
Night Beast
Mauler Mithel with Expose
This list has a nice range of higher than average Pilot Skills in conjunction with Howlrunner to let Night Beast fire at above his pay grade. Hull Upgrade also should buy her a little bit of time as she is commonly focused first. Mauler is deadly at Range 1 especially with Expose and poses a threat to one shot an unlucky ship. Backstabber is also no slouch. I like the combination of threats that this list poses.
See you all on Thursday!
Thursday, May 1, 2014
Countering Soontir Fel
Soontir Fel. I have played with him and against him. He can be a very dangerous model to face especially in the late game as his opposition decreases. As his appearance seems to be increasing in the meta I think it might be a good time to talk counters.
Rebel
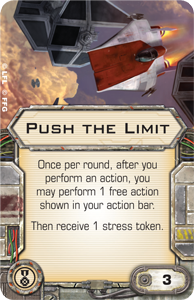
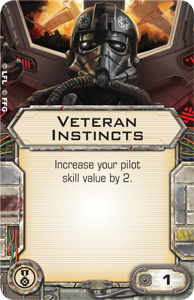
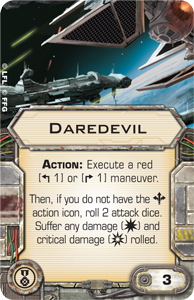
Turrets are the obvious answer. If he can't stay out of range of opposing fire arcs much of what makes him strong is lost. Anyone taking the Millennium Falcon is already is already countering him thanks to the large ships ample base size and 360 degree fire arc. In the same vein an Ion Cannon can also ruin his day. Robbing him of the flexibility of his maneuverability is critical. If you manage to get an ion token while stressed, which is common thanks to people using Push the Limit to take synergize with his Pilot Ability, then he is pretty much neutered at that point. Lastly you could consider taking Tycho Celchu with Veteran Instincts and Push the Limit or Daredevil in order to try and counter him in a dogfighting sense. In that configuration the A-Wing can almost keep up with the TIE Interceptors maneuvers and has a higher pilot skill. Lastly Tycho, like Soontir, is not dissuaded from being Stressed.
Playtest Addendum
After play testing the most cost efficient way to shut him down is the following at 23 points.
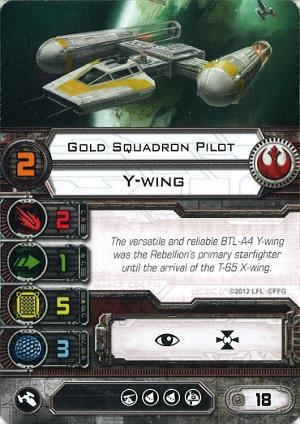
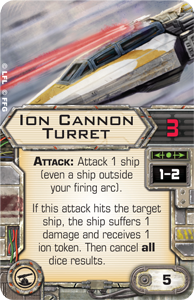
Gold Squadron with Ion Cannon Turret
Combined with a target lock you should with a little planning be able to ruin his day. The threat of the ion turret either keeps him from being stressed, thus neutralizing his pilot ability, or forces him to stay at range 3 of the Y-Wing who can fly in the center of your formation and wait patiently. It is a cheap addition to any list and has uses outside of countering Soontir.
Empire
Due to the Empire's lack of turrets they must approach it from a different perspective. Going with the big ship option; a pair of Bounty Hunters can cover a lot of area with their twin fire arcs. Soontir might still be able to find a gap but you can greatly diminish his chances with staggered formations and careful maneuvering. Also taking Carnor Jax with Veteran Instincts might work as you can move to stay near Soontir and keep him from using Focus or Evade as well as potentially getting the drop on him thanks to having a higher Pilot Skill. Lastly the obvious dogfighting option is to take your own Soontir Fel. You will have to outplay your opponent and hope the dice stay with you but at least you know you will shoot at the same time and you both have the same tricks. A game might very well devolve into a mirror match with a pair of Soontirs dancing around waiting for a opening in that case.
In the event of the mirror match it might be prudent to design your list to conserve points as much as possible. Tying up some points in a tanky shuttle build might make be the difference that denies those points to your opponent and possibly forces him to compromise his position so that your Soontir Fel can get the drop on his doppleganger. Here is an example of a list that might take advantage of that.
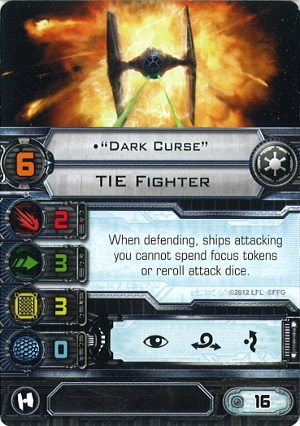
Soontir Denial 100 points
Academy Pilot
Dark Curse
Night Beast
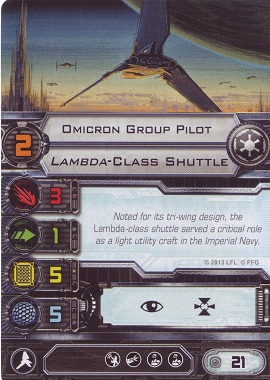
Omicron Group Pilot with Darth Vader and Recon Specialist
Soontir Fel with Push the Limit
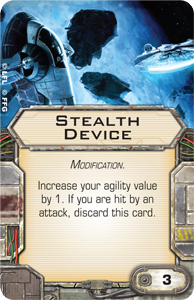
The purpose of this list is to try and deny points and so you take the two most survivable TIE pilots to try and eat volleys that do nothing. Evade tokens are going to be a popular action in this list. The shuttle has the Recon Specialist to increase dice odds when defending and Vader to insure damage on unshielded models if they ever stumble into your fire arc. Lastly the list is rounded out with an extra Academy TIE because the points were available but this could easily become more upgrades for the shuttle or a Stealth Device or Hull Upgrade on Soontir and the TIEs which might tip you over the edge in a mirror match.
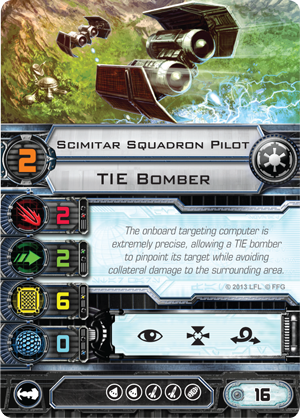
75x75 - Imperial Tank 75 points
Omicron Group Pilot with Advanced Sensors and Recon Specialist
x3 Scimitar Squadron Pilot
If you are willing to give up maneuverability then you too can have a points denial list which brings 28 hit points to the table. Everyone is at Pilot Skill 2 which helps for maneuvering (in straight lines) and shooting before Pilot Skill 1. The shuttle will be taking a Focus action every turn and benefitting from it offensively and defensively. The bombers are simply less maneuverable TIE fighters for the purposes of this list. It is effectively a micro-swarm based around the shuttle instead of the Firespray-31. Short of three shuttles it is the most hit points you can bring to the table at this points level.
See you all again on Tuesday!
Rebel
Turrets are the obvious answer. If he can't stay out of range of opposing fire arcs much of what makes him strong is lost. Anyone taking the Millennium Falcon is already is already countering him thanks to the large ships ample base size and 360 degree fire arc. In the same vein an Ion Cannon can also ruin his day. Robbing him of the flexibility of his maneuverability is critical. If you manage to get an ion token while stressed, which is common thanks to people using Push the Limit to take synergize with his Pilot Ability, then he is pretty much neutered at that point. Lastly you could consider taking Tycho Celchu with Veteran Instincts and Push the Limit or Daredevil in order to try and counter him in a dogfighting sense. In that configuration the A-Wing can almost keep up with the TIE Interceptors maneuvers and has a higher pilot skill. Lastly Tycho, like Soontir, is not dissuaded from being Stressed.
Playtest Addendum
After play testing the most cost efficient way to shut him down is the following at 23 points.
Gold Squadron with Ion Cannon Turret
Combined with a target lock you should with a little planning be able to ruin his day. The threat of the ion turret either keeps him from being stressed, thus neutralizing his pilot ability, or forces him to stay at range 3 of the Y-Wing who can fly in the center of your formation and wait patiently. It is a cheap addition to any list and has uses outside of countering Soontir.
Empire
Due to the Empire's lack of turrets they must approach it from a different perspective. Going with the big ship option; a pair of Bounty Hunters can cover a lot of area with their twin fire arcs. Soontir might still be able to find a gap but you can greatly diminish his chances with staggered formations and careful maneuvering. Also taking Carnor Jax with Veteran Instincts might work as you can move to stay near Soontir and keep him from using Focus or Evade as well as potentially getting the drop on him thanks to having a higher Pilot Skill. Lastly the obvious dogfighting option is to take your own Soontir Fel. You will have to outplay your opponent and hope the dice stay with you but at least you know you will shoot at the same time and you both have the same tricks. A game might very well devolve into a mirror match with a pair of Soontirs dancing around waiting for a opening in that case.
In the event of the mirror match it might be prudent to design your list to conserve points as much as possible. Tying up some points in a tanky shuttle build might make be the difference that denies those points to your opponent and possibly forces him to compromise his position so that your Soontir Fel can get the drop on his doppleganger. Here is an example of a list that might take advantage of that.
Soontir Denial 100 points
Academy Pilot
Dark Curse
Night Beast
Omicron Group Pilot with Darth Vader and Recon Specialist
Soontir Fel with Push the Limit
The purpose of this list is to try and deny points and so you take the two most survivable TIE pilots to try and eat volleys that do nothing. Evade tokens are going to be a popular action in this list. The shuttle has the Recon Specialist to increase dice odds when defending and Vader to insure damage on unshielded models if they ever stumble into your fire arc. Lastly the list is rounded out with an extra Academy TIE because the points were available but this could easily become more upgrades for the shuttle or a Stealth Device or Hull Upgrade on Soontir and the TIEs which might tip you over the edge in a mirror match.
75x75 - Imperial Tank 75 points
Omicron Group Pilot with Advanced Sensors and Recon Specialist
x3 Scimitar Squadron Pilot
If you are willing to give up maneuverability then you too can have a points denial list which brings 28 hit points to the table. Everyone is at Pilot Skill 2 which helps for maneuvering (in straight lines) and shooting before Pilot Skill 1. The shuttle will be taking a Focus action every turn and benefitting from it offensively and defensively. The bombers are simply less maneuverable TIE fighters for the purposes of this list. It is effectively a micro-swarm based around the shuttle instead of the Firespray-31. Short of three shuttles it is the most hit points you can bring to the table at this points level.
See you all again on Tuesday!
Tuesday, April 29, 2014
Winning Lists of the Game Kastle Santa Clara Event on 04/19/14
I suppose the big news was that I got to see the GR-75 Rebel Transport first hand last night but Im sure other blogs are doing unpacking reviews and perhaps have even played a game or two with them so I won't rehash that here. I did find out what lists won the event I attended two weeks ago and thought it was interesting. It was a tie for first place. Here are the lists:
Note: If there are any inaccuracies please let me know and I will correct them. Thank you.
List 1:
Ibitsam
Luke Skywalker
Chewbacca
Note: I do not know how, or if, they spent the 2 points which are unaccounted for in this list
List 2:
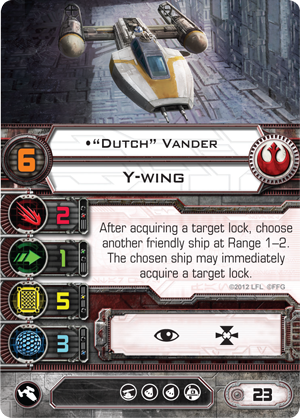
Blue Squadron Pilot with Advanced Sensors
Dutch Vander with Ion Cannon Turret
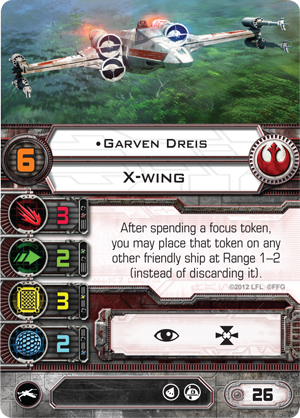
Garven Dreis
Rookie Pilot
The first list stuck out to me initially as I wasn't sure I saw the synergy but then I realized that all three of those ships are very tough in their own way. Chewbacca is obvious and is a well known tank in Rebel three ship lists. Luke's ability increases his survivability and he is more difficult to kill than one would expect from a lone X-Wing. Ibitsam's ability works for offensive and defensive rolls. So as long as she has a stress token she can re-roll her single Agility die and that can add up over time.
The second list is very consistent in terms of firepower as well as board control with the ion cannon. The action economy provided by Dutch and Garven is nice and the combination of 6/2 Pilot Skill should help a bit in maneuvering. I've seen this list flown and it is flown in a very tight windmill formation that does not leave obvious choices in target priority and insures that everyone gets to shoot. The B-Wing rides in the back while Garven and Dutch go in the middle and the Rookie leads.
75x75 Micro-Swarm 75 points
Bounty Hunter with Recon Specialist
x3 Obsidian Squadron Pilot
This is simply a shrunk down version of the standard Firespray-31 mini-swarm list. It combines the firepower and health of the Firespray with a trio of TIE fighters. If one were so inclined they could take Academy TIEs instead of Obsidian Squadron and spend three more points elsewhere but I feel that having everyone at Pilot Skill 3 is useful both for maneuvering as well as having an edge against lower Pilot Skill lists which I expect there will be many of at the event.
See you all on Thursday!
Note: If there are any inaccuracies please let me know and I will correct them. Thank you.
List 1:
Ibitsam
Luke Skywalker
Chewbacca
Note: I do not know how, or if, they spent the 2 points which are unaccounted for in this list
List 2:
Blue Squadron Pilot with Advanced Sensors
Dutch Vander with Ion Cannon Turret
Garven Dreis
Rookie Pilot
The first list stuck out to me initially as I wasn't sure I saw the synergy but then I realized that all three of those ships are very tough in their own way. Chewbacca is obvious and is a well known tank in Rebel three ship lists. Luke's ability increases his survivability and he is more difficult to kill than one would expect from a lone X-Wing. Ibitsam's ability works for offensive and defensive rolls. So as long as she has a stress token she can re-roll her single Agility die and that can add up over time.
The second list is very consistent in terms of firepower as well as board control with the ion cannon. The action economy provided by Dutch and Garven is nice and the combination of 6/2 Pilot Skill should help a bit in maneuvering. I've seen this list flown and it is flown in a very tight windmill formation that does not leave obvious choices in target priority and insures that everyone gets to shoot. The B-Wing rides in the back while Garven and Dutch go in the middle and the Rookie leads.
75x75 Micro-Swarm 75 points
Bounty Hunter with Recon Specialist
x3 Obsidian Squadron Pilot
This is simply a shrunk down version of the standard Firespray-31 mini-swarm list. It combines the firepower and health of the Firespray with a trio of TIE fighters. If one were so inclined they could take Academy TIEs instead of Obsidian Squadron and spend three more points elsewhere but I feel that having everyone at Pilot Skill 3 is useful both for maneuvering as well as having an edge against lower Pilot Skill lists which I expect there will be many of at the event.
See you all on Thursday!
Thursday, April 24, 2014
Firespray-31 Teardown
Note: User feedback has suggested that I add links to cards and ships in order for newer players to more easily follow what I am rambling on about. I am giving it a try in this article. Let me know what you think.
Slave-1. This is what the Firespray-31 model is painted to look like and invariably it is the name that springs to mind when this distinctive ship appears on the field. However this model of ship while not as numerous as other ships was used by many nefarious and cunning types. I would like to review the ship and the available pilots to try and find some interesting ways to use this ship.
Starting with the stats; it has 10 combined points of health which so far matches with the other medium base (I am reserving large base for the larger ships coming out) model which is the Lambda Shuttle. 3 Attack Dice is also on par with the Lambda as well as having Target Lock and Focus. That is where the similarities end. Assuming a base cost of 21 points for the Omicron Pilot and 33 points for the Bounty Hunter this is what that 12 points buys you. +1 point of Pilot Skill, +1 Agility Die, the Evade Action, a rear facing firing arc, and the ability to Equip Missiles, Mines, and/or Torpedoes. Also it is very important to note that the Firespray-31 is vastly more maneuverable than its Lambda counterpart.


As the rear facing firing arc is the closest thing the Imperials have to a turret that makes it especially valuable to take for any list which needs to threaten a greater area along a flank or outside a formation. In my opinion the Firespray makes the Mini-Swarm build for the Imperials a real threat. While the Lambda can also form the foundation of Mini-Swarm as well it cannot keep up with Imperial Fighters, only threatens the front, and cannot K-Turn. All of the following builds assume a Mini-Swarm build around it though I have seen strong lists containing nothing but Firespray-31s and/or Shuttles as well.
Note: A Mini-Swarm is the addition of 4 or more TIE-type fighters in order to round out a list containing a single Firespray-31.
Bounty Hunter with Recon Specialist and Seismic Charges
This build comes in at 37 points. The Recon Specialist increases the reliability of the offensive output as well as usually leaving a Focus token left over for defense. The Seismic Charges makes the rear arc of this model even more threatening and at the right time could be used to yield some automatic damage with no dice rolling. Very useful for getting the last point on a hard to kill ship or for forcing your opponent to reconsider flying in tight formation.
Note: Two of these and a Lambda with Vader makes for a very decent list.
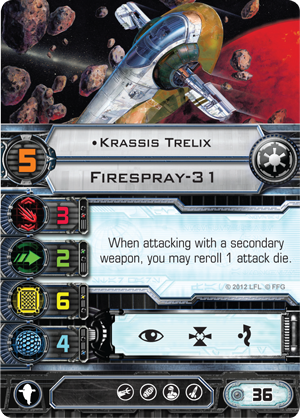
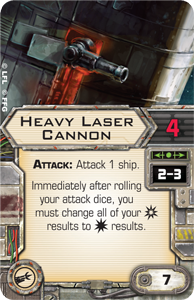
Krassis Trelix with Heavy Laser Cannon
This build comes in at 43 points. Krassis was made for the Heavy Laser Cannon with his ability to reroll an Attack Die when using a secondary weapon he has a much greater chance of hanging onto a Focus token or perhaps getting more mileage from one and it means he has somewhat less reliance on Target Lock. This build is always attacking with 4 Attack Dice in the front arc regardless of range and that makes it a serious threat which is needs to be at that points level.
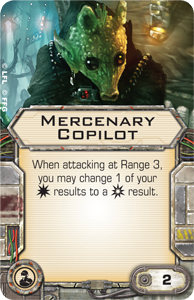
Kath Scarlett with Mercenary Copilot
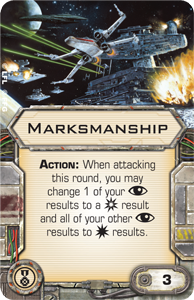
This build comes in at 40 points. Kath's ability to potentially cause stress is very powerful. For two more points while at Range 3 you can guarantee a Crit if you can score at least one Hit result. Another idea would be taking Marksmanship for 1 point more since Kath is an Elite Pilot but I personally prefer keeping her Action free as she has lots of good options to choose from.
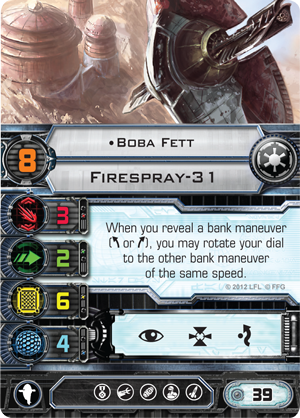
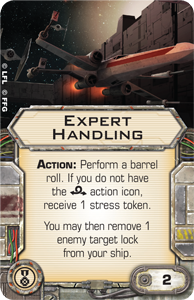
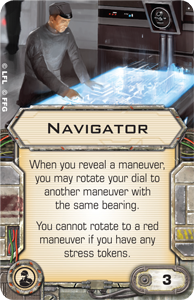
Boba Fett with Expert Handling and Navigator
This build comes in at 44 points. This build takes advantage of Boba's ability to change bearings combined with the Navigator to essentially become highly unpredictable on the field. The ability to change your move to compensate for battlefield conditions is useful though that usefulness is slightly reduced by Boba's high Pilot Skill of 8. In addition being able to Barrel Roll on a medium base model is very powerful. This should keep the board open as well as preventing collisions and or potential bumps.
In conclusion I am really glad to see this model on the table more. I think it is strong in the current meta and if used correctly presents a serious threat that can divert some firepower away from your TIE fighters long enough not to miss those lost attack dice from just taking one of the TIE swarm flavors.
75x75 - 3 Headed Whelp
Biggs Darklighter with Hull Upgrade and R5-D8
x2 Rookie Pilot with R2 Astromech
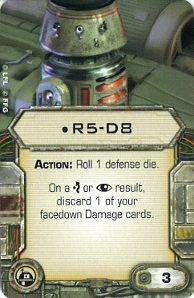
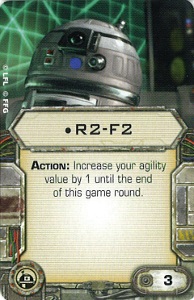
This list comes in at 75 points. A variant of the 3 Headed Dragon list scaled down for use at 75 points. I have found three X-Wings can still be a threat at 100 points when properly tooled and the effect works just as well scaling down. Using Biggs to soak damage and possibly regenerate 1 or 2 health while your Rookies do some work in applying the hurt. I feel that R5-D8 is a little underused though this should change now that Hull Upgrade is out and has had some time to propagate. I am more of a fan of this rather then the Stealth build on Biggs (Stealth Device and R2-F2) because Stealth Device is negated as soon as you take a hit and R2-F2 requires you to use your Action on him as much as possible to be effective whereas R5-D8 doesn't need to be used until after your Shields are gone thus freeing up Biggs for a turn or two of using Focus or Target Lock.
See you all next week!
Slave-1. This is what the Firespray-31 model is painted to look like and invariably it is the name that springs to mind when this distinctive ship appears on the field. However this model of ship while not as numerous as other ships was used by many nefarious and cunning types. I would like to review the ship and the available pilots to try and find some interesting ways to use this ship.
Starting with the stats; it has 10 combined points of health which so far matches with the other medium base (I am reserving large base for the larger ships coming out) model which is the Lambda Shuttle. 3 Attack Dice is also on par with the Lambda as well as having Target Lock and Focus. That is where the similarities end. Assuming a base cost of 21 points for the Omicron Pilot and 33 points for the Bounty Hunter this is what that 12 points buys you. +1 point of Pilot Skill, +1 Agility Die, the Evade Action, a rear facing firing arc, and the ability to Equip Missiles, Mines, and/or Torpedoes. Also it is very important to note that the Firespray-31 is vastly more maneuverable than its Lambda counterpart.
(read in George Takei's voice) Oh my
As the rear facing firing arc is the closest thing the Imperials have to a turret that makes it especially valuable to take for any list which needs to threaten a greater area along a flank or outside a formation. In my opinion the Firespray makes the Mini-Swarm build for the Imperials a real threat. While the Lambda can also form the foundation of Mini-Swarm as well it cannot keep up with Imperial Fighters, only threatens the front, and cannot K-Turn. All of the following builds assume a Mini-Swarm build around it though I have seen strong lists containing nothing but Firespray-31s and/or Shuttles as well.
Note: A Mini-Swarm is the addition of 4 or more TIE-type fighters in order to round out a list containing a single Firespray-31.
This build comes in at 37 points. The Recon Specialist increases the reliability of the offensive output as well as usually leaving a Focus token left over for defense. The Seismic Charges makes the rear arc of this model even more threatening and at the right time could be used to yield some automatic damage with no dice rolling. Very useful for getting the last point on a hard to kill ship or for forcing your opponent to reconsider flying in tight formation.
Note: Two of these and a Lambda with Vader makes for a very decent list.
Krassis Trelix with Heavy Laser Cannon
This build comes in at 43 points. Krassis was made for the Heavy Laser Cannon with his ability to reroll an Attack Die when using a secondary weapon he has a much greater chance of hanging onto a Focus token or perhaps getting more mileage from one and it means he has somewhat less reliance on Target Lock. This build is always attacking with 4 Attack Dice in the front arc regardless of range and that makes it a serious threat which is needs to be at that points level.
Kath Scarlett with Mercenary Copilot
This build comes in at 40 points. Kath's ability to potentially cause stress is very powerful. For two more points while at Range 3 you can guarantee a Crit if you can score at least one Hit result. Another idea would be taking Marksmanship for 1 point more since Kath is an Elite Pilot but I personally prefer keeping her Action free as she has lots of good options to choose from.
Boba Fett with Expert Handling and Navigator
This build comes in at 44 points. This build takes advantage of Boba's ability to change bearings combined with the Navigator to essentially become highly unpredictable on the field. The ability to change your move to compensate for battlefield conditions is useful though that usefulness is slightly reduced by Boba's high Pilot Skill of 8. In addition being able to Barrel Roll on a medium base model is very powerful. This should keep the board open as well as preventing collisions and or potential bumps.
In conclusion I am really glad to see this model on the table more. I think it is strong in the current meta and if used correctly presents a serious threat that can divert some firepower away from your TIE fighters long enough not to miss those lost attack dice from just taking one of the TIE swarm flavors.
75x75 - 3 Headed Whelp
Biggs Darklighter with Hull Upgrade and R5-D8
x2 Rookie Pilot with R2 Astromech
This list comes in at 75 points. A variant of the 3 Headed Dragon list scaled down for use at 75 points. I have found three X-Wings can still be a threat at 100 points when properly tooled and the effect works just as well scaling down. Using Biggs to soak damage and possibly regenerate 1 or 2 health while your Rookies do some work in applying the hurt. I feel that R5-D8 is a little underused though this should change now that Hull Upgrade is out and has had some time to propagate. I am more of a fan of this rather then the Stealth build on Biggs (Stealth Device and R2-F2) because Stealth Device is negated as soon as you take a hit and R2-F2 requires you to use your Action on him as much as possible to be effective whereas R5-D8 doesn't need to be used until after your Shields are gone thus freeing up Biggs for a turn or two of using Focus or Target Lock.
See you all next week!
Tuesday, April 22, 2014
Event Summary - Game Kastle Santa Clara 04/19/14
I had the fortune to participate in the store tournament at Game Kastle in Santa Clara last week. It was a huge event with over 32 players showing up which I suspect is more than the store was expecting. They managed to get 16 tables together but things started a bit late. Here is a summary of the match ups I remember. If you were there and I made any mistakes please let me know.
The list I brought was 100 points.
Dutch Vander with Ion Cannon Turret
Garven Dreis
Gold Squadron with Ion Cannon Turret
Rookie Pilot
Round 1 - My first opponents list looked something like this. I believe it was 100 points.
Blue Squadron Pilot with Advanced Sensors
Garven Dreis
Lando Calrissian with Millenium Falcon Title, Nein Nunb, and Weapons Engineer
The opening went well for me with the destruction of the B-Wing and all my ships remaining intact. I then managed to get Garven down to 1 Hull. However I spent three turns trying to finish Garven off so I could focus on controlling Lando with my Y-Wings but it wasn't meant to be. He picked off my ships one by one and at the end I had a single Y-Wing left. I gave him full points for his tie breakers and moved on to my next round.
Round 2 - I believe my opponents list was 100 points.
Academy Pilot
Bounty Hunter
Dark Curse
Mauler Mithel
Royal Guard Pilot
My opponent played this mixed swarm list pretty effectively and the only ship I managed to take out was Dark Curse. I did have the Bounty Hunter down to 2 Hull but nothing else was destroyed. He only managed to take out Garven after some heroic evading by the Rookie Pilot so in the end he won by 10 points. I have him full points for his tie breakers.
Summary
My list was very conservative and a bit too control heavy in my opinion. One Ion Cannon Turret would have been useful but two was overkill. Dutch's ability was decent and had synergy with Garven's ability for action efficiency but it wasn't enough to overcome the low firepower of the list. Additionally I made some maneuvering mistakes my first game that cost me some shooting by K-Turning too late.
I saw many different lists there and there was a great deal of diversity which was really great to see. I am not sure who placed at the event and what they took but it anyone knows it would be great to be able to post that information here. Overall it was a good time and I'd like to give a big thank you to Game Kastle for providing the space and TO for the tournament.
75x75 - A-Wing Swarm
x5 Prototype Pilot with Chaardan Refit
I believe this might be a lot of fun to run at this event as it is rare to get to use an unreleased card outside of friendly games. It takes on the TIE swarm approach and in the limited format may be quite strong especially as the list has more hit points than a regular TIE swarm. I know that at least one person is going to run this list and I am very excited to see it on the field.
On Thursday we post the Firespray-31 Teardown. See you then!
Thursday, April 17, 2014
Local Meta
The other night I got to hear about and experience some interesting lists that I thought were worth sharing. The first is 100 points.
This is pretty straight forward. Five TIE bombers and the ability to time an attack run to ruin someones day with 5 damage. This can one-shot a lot of ships which should keep people from tailing you. Otherwise it is just five TIE Bombers which Ive talked about in other articles. This could be considered a defensive alpha strike list. In the same vein is another list at 100 points.
x5 Scimitar Squadron
Howlrunner with Swarm Tactics
This is TIE Bomber swarm. It needs Howlrunner to provide dice consistency but it is a lot of meat to chew through and is six TIE fighters worth of firepower. A potential drawback I see in this list is formation flying Bombers with Howlrunner might be challenging. Also she is pretty vital to the list and is she goes down this list loses a lot of its punch in my opinion.
x4 Grey Squadron with Ion Cannon Turret
This list is 100 points and provides a lot of control in the form of the ion cannons but is limited by the maneuver dial of Y-Wing a bit. I do like how tough it is and the damage is consistent ifa little less bursty than people tend to like.
x2 Bounty Hunters w/ Recon Specialist & Seismic Charge
Omicron Shuttle with Darth Vader
This is a list I like a lot. It is 100 points. I've played against it and with it and found it to be tough and able to dish out damage like clockwork. It is vulnerable to hostile asteroid placement in a big way so that has to be considered and I would advise practice in formation with flying big ships. A hint: You actually don't mind if your shuttle bumps every turn in order to keep it moving along with the group.
75x75 - Mixed Swarm
x2 Alpha Squadron Pilot
x3 Obsidian Squadron Pilot
This list is 75 points and brings fives TIEs to the table. It has a decent blend of firepower and hit points and the Obsidian Squadron pilot skill bump may give you an edge against Academy TIEs. Also you can easily fly in two groups which may help if anyone brings Assault Missiles. The slight edge on firepower with the TIE Interceptors may give you what you need to overcome a TIE swarm mirror match.
See you all again next week!
x5 Gamma Squadron Pilots with Seismic Charge
This is pretty straight forward. Five TIE bombers and the ability to time an attack run to ruin someones day with 5 damage. This can one-shot a lot of ships which should keep people from tailing you. Otherwise it is just five TIE Bombers which Ive talked about in other articles. This could be considered a defensive alpha strike list. In the same vein is another list at 100 points.
x5 Scimitar Squadron
Howlrunner with Swarm Tactics
This is TIE Bomber swarm. It needs Howlrunner to provide dice consistency but it is a lot of meat to chew through and is six TIE fighters worth of firepower. A potential drawback I see in this list is formation flying Bombers with Howlrunner might be challenging. Also she is pretty vital to the list and is she goes down this list loses a lot of its punch in my opinion.
x4 Grey Squadron with Ion Cannon Turret
This list is 100 points and provides a lot of control in the form of the ion cannons but is limited by the maneuver dial of Y-Wing a bit. I do like how tough it is and the damage is consistent ifa little less bursty than people tend to like.
x2 Bounty Hunters w/ Recon Specialist & Seismic Charge
Omicron Shuttle with Darth Vader
This is a list I like a lot. It is 100 points. I've played against it and with it and found it to be tough and able to dish out damage like clockwork. It is vulnerable to hostile asteroid placement in a big way so that has to be considered and I would advise practice in formation with flying big ships. A hint: You actually don't mind if your shuttle bumps every turn in order to keep it moving along with the group.
75x75 - Mixed Swarm
x2 Alpha Squadron Pilot
x3 Obsidian Squadron Pilot
This list is 75 points and brings fives TIEs to the table. It has a decent blend of firepower and hit points and the Obsidian Squadron pilot skill bump may give you an edge against Academy TIEs. Also you can easily fly in two groups which may help if anyone brings Assault Missiles. The slight edge on firepower with the TIE Interceptors may give you what you need to overcome a TIE swarm mirror match.
See you all again next week!
Wednesday, April 16, 2014
Elite Wing
One of my favorite Imperial lists right now is one that I have been calling Elite Wing. It consists of all six of the named TIE fighter pilots with 3 points to spare. My most common build is the following:
Howlrunner with Stealth Device
Mauler Mithel
Backstabber
Dark Curse
Night Beast
Winged Gundark
The advantages of this list are:
Reasonably high Pilot Skill (5, 5, 6, 6, 7, 8 respectively)
A range of special abilities
Six models
3 Evade on all models
The disadvantages are:
Potential traffic jams from having six models.
Only 2 Attack Dice base
No Shields
Models that can die in one hit reasonably easily.
I prefer to take a Stealth Device on Howlrunner as she is a common target and because of the way I run her. I usually form my TIE's into two groups. One group consists of Howlrunner, Mauler, and Winged Gundark. The second group is Backstabber, Dark Curse, and Nightbeast. I generally set the first group in a position to rush straight forward into the waiting jaws of my enemy. This is because all three have abilities that maximize shooting and I really want to be at Range 1 when I do so. So of the three targets shooting at Howlrunner usually makes the most sense. Hence the Stealth Device in order to survive a turn of eating volleys.
I keep a little distance with the second group as they have more defensive abilities with the exception of Backstabber who loves to go after people from outside their firing arc if at all possible. Backstabber is also the lone operator in the group and sometimes I will send him off alone on a flank to prowl for the right opening. I tend to do strafing passes letting one group rest outside of arc while the other three perform their attack passes. This means I should have no less than three models attacking at any given time. This also helps reduce my exposure during turns where I lose two or more models.
I think this list is strong but it is not very tolerant of mistakes and requires some finesse to get the most out of. Extreme diligence is required during the movement phase in order to prevent self sabotage. Strict focus fire is also a necessity. Prioritize your targets and insure their destruction. I have also found that I Evade quite often in order to help survive being destroyed in one volley. However even with this I generally lose one model a turn starting on turn 2 so keep attrition in mind when calculating future turns.
To wrap things up here is my ranking of the six named TIE pilots based on personal experience.
Howlrunner
Mauler Mithel
Backstabber
Winged Gundark
Night Beast
Dark Curse
Howlrunner is a AoE re-roll attached to Pilot Skill 8 for 18 points. Being useful and a bargain is how you end up on top of the ranking. Mauler comes second with his still very respectable Pilot Skill of 7 and ability which adds an attack die at Range 1. Helping to shore up a weakness of the TIE platform is huge so for 17 points he is second. For the same reasons as Mauler but with a condition attached Backstabber comes third. Winged Gundark has a damage buff and for TIE fighters I rank any form of damage increase over defense so he comes fourth. Night Beast is fifth. His ability is useful but you wont always get to use due the necessity of K-Turns during attack runs. I am not a big fan of defense buffs on TIEs in general. So Dark Curse comes last because his ability is solely defensive and situational.
Until the tournament for The Wookie Won we are going showcase ideas for 75 point lists as that is the tournament's point level. Here is a list that has been playtested successfully already It is 73 points.
75x75 - Big Beef
x2 Blue Squadron with Advanced Sensors
x1 Gold Squadron with Ion Cannon Turret
This list is very tanky for starters with 24 total hit points. A pair of B-Wings is never a bad thing to base a list off of and the Y-Wing, though not very maneuverable, does not care thanks to its turret weapon. All the models have Pilot Skill 2 which makes activation go a little easier and you will hit before Academy TIEs. Lastly you have the Ion Cannon Turret which lets you control single models (like Soontir Fel) and help slow down targets so that the B-Wings can pivot and destroy them. There are 2 points open for upgrades like an R2 Astromech on the Y-Wing or you can leave them unspent if you simply want to guarantee initiative.
Thursday, April 10, 2014
75x75 Tournament
We are sponsoring a tournament!
Date & Time: May 17th @ Noon
Location: Game Kastle
1350 Coleman Ave, Santa Clara, CA (map)
Phone: (408) 243-4263
Points: 75 points
Round Time Limit: 75 minutes
Entry Fee: $5.00
Rules:
Players bring one set of models to play for the entire duration of the tournament and it cannot be changed between rounds. Before the first round the tournament organizer will take a note of each players list in order to insure compliance.
When time is called the current round will finish in order to insure all models have had a chance to act. This is to insure fairness and to not discriminate against lower pilot skill models in the Combat Phase.
In the event of an uneven number of players the bye will be randomly assigned. That individual will play the tournament organizer and regardless of the games outcome will receive a Win with 38 points for the purposes of determining the next matchup.
All currently available expansions are allowed (i.e. Imperial Aces, etc) This means if you can buy it, you can play it.
Rebel Players may proxy the Chardaan Refit card in their lists.

This means they may use the ability listed on this card without possessing the physical card. All other cards must be present per the standard rules and no other proxy cards or unreleased cards are permitted. Printouts of this card can be provided by the tournament organizer if needed for your opponent.
Note: All lists and pictures of the games will be published on the blog. Please expect this.
Prizes: Game Kastle Gift Cards, Star Wars mini lego sets, and a custom TIE fighter repaint which will be previewed on the blog. There will be a 1st place, 2nd place, 3rd place, and Last Place (Best of the Worst) Prize.
Note: If you own regulation size game mats we would appreciate them being brought for use during the tournament.
Sign up today by emailing thetrickybuddha@gmail.com
Tuesday, April 8, 2014
A-Wing Teardown
The A-wing is one of my favorite ships in Star Wars but in regards to X-Wing I notice that among the people I talk to there doesn't seem to be much respect for it. I have spent a lot of time and many games trying to figure out the best use for it. I'm aware there is a card being released in Rebel Aces that will reduce its cost by 2 points and while I think that is welcome I do not factor it into this article.
When I look over the A-Wing my first thought was where is barrel roll? Boost is a great ability but I honestly expected it to have barrel roll. My second thought is damn this thing is maneuverable. It has the most green maneuvers of any dial in the game as 50% of its maneuvers are green. It is identical to the TIE Interceptor with the only difference being that the 5 straight maneuver for the A-Wing is green where as it is white for the TIE Interceptor. Some highlights of the dial are its two K-Turns at 3 and 5, a straight green 5, and every maneuver at 2 being green.
At first my thinking was to use it as a cheap missile platform but with the Z-95 Headhunter coming out it will make no sense in that role. If you are going to use a cheap A-Wing then use it to obstruct and confuse enemy movement. A Prototype A-Wing makes for a good bumper car. It isn't an Academy TIE but it is the second most economically priced model in the Rebel fleet behind the HWK-290 at least until the Headhunter shows up.
The bumper car concept is to get it out there to be as big a thorn in your opponents side as you can. Conveniently you will likely be at range 1 most the time. While not quite as durable as an X-Wing you are close and with 3 Agility you should be able to weather a couple volleys. Which also means more important ships aren't getting shot at. A bumper car can find a home in many lists due to its low cost and high utility but I prefer to use an A-Wing as an elite flanker. Until Jake Farrell comes out my preferred A-Wing build is below. It costs 30 points.
Full Commitment A-Wing
Tycho Celchu with Opportunist
Now why did I choose this? Because he is the best A-Wing pilot in my opinion with the only ability in the game that lets you ignore stress tokens except for maneuvering. My temptation was to give him Expert Handling and get access to Barrel Roll but I have decided after play testing that he can survive without it. Instead Opportunist shores up a big weakness of the A-Wing in general which is its 2 Attack dice. Opportunist isn't a no brainer for every pilot but for the only pilot in the game who minimize the impact of stress it seems to work well.
With Opportunist and a willingness to get up close and personal you could be rolling up to 4 Attack dice. That is an X-Wing level attack and should force people to reconsider their attack priorities. True its nearly a third of your build total but he could potentially dish out as much as an X-Wing and with the ability to Boost after your maneuver you should be able to minimize return fire. Like a TIE fighter it is very important to stay out of arc as much as possible.
Here is an example list which I have play tested. It costs 99 points.
x2 Rookie Pilots
x1 Dagger Squadron with Advanced Sensors
Tycho Celchu with Opportunist
Now all of this comes with a caveat which is that an A-Wing needs to be with at least three other models to be effective. I don't believe that it can stand up to the scrutiny (read: Combat Phase) of being one of three targets. But as one of four it should lower its priority enough to allow it to do its thing which is control a flank, harass movement options, and get in close range shots. Some other list options not covered that spring to mind are YYXA, BBXA, and YBXA.
Another build that my friend came up with is the following for 26 points.
Green Squadron Pilot with Expose and Stealth Device
With this you can safely use Expose for a turn or two while maintaining three Evade dice. I also think this can work well with Opportunist. You can keep your action to Evade as well as the 4 Evade dice until you are hit though it is more situational.
Here is a list utilizing the above build minus the Stealth Devices on the A-Wings for those who actually own three A-Wings.
x3 Green Squadron Pilot with Expose
Biggs Darklighter with R2-F2 and Stealth Device
This is is designed to have Biggs tank while your A-Wings do their thing without fear of being shot at with reduced Agility. Biggs can (and should) have 5 Evade dice base so he can soak fire. The list is vulnerable to AoE damage effects like Assault Missiles and is a bit predictable due to the need to stay close to Biggs but it is interesting nonetheless.
Don't be afraid to field an A-Wing. With practice you may surprise people who underestimate what you can do and you will only like it more when Rebel Aces comes out and it grows in popularity thanks to its lowered cost and the great cards coming out to support it.
For this weeks The Wookie Won here is a three X-Wing list that I created that should prove fun to field. I did not name it as most of theses lists are just variants of the original concept called 3 Headed Dragon. The list is 100 points.
Wedge Antilles with Expose and Hull Upgrade
Luke Skywalker with Draw Their Fire and R2-D2
Biggs Darklighter with R2-F2 and Stealth Device
This is a pretty rough list. As long as you keep Biggs the target for the opening salvos he should have 5 Agility which should soak some fire. Then Luke has his own ability combined with the ability to take a critical hit off of Biggs then heal the shield with R2-D2. Lastly Wedge has a chance to risk using Expose for a turn or two while Biggs is alive so that he can worry less about only having 1 Agility.
Wednesday, April 2, 2014
Hobby Sector - TIE Fighter Repaint
So in this new segment I will be showing modifications and repaints that I have done or that I run into that I think are worth sharing. I have started with my TIE fighter repaints. I know that the Empire wasn't big on custom paint jobs but I wanted a way to easily distinguish my TIEs from my opponents and I wanted them to still be interesting looking without being overly flashy. I think this was a good balance.


We will return on Tuesday.
Tuesday, April 1, 2014
Boba the Fett
Just for fun next time you play at 75 points consider taking the most expensive build in the game.


Boba Fett - Big Spender 75 points
Boba Fett with Advanced Proton Torpedoes, Gunner, Homing Missiles, Heavy Laser Cannon,
Opportunist, Proton Bombs, and Shield Upgrade
Roll deep with the baddest hired gun in the galaxy! You will be sure to conquer all of the enemies. Much win. Fear nothing (except for Lightning Guns and Saarlac Pits) and get fat paid! Only one ship? No problem for Boba who packs an one extra shield because that's all he needs. Missiles and torpedoes say other big ships can suck it. Use your Gunner and Heavy Laser Cannon to vaporize TIE fighters in a single shot. Of course Boba has Opportunist. He is the only character who should be able to take it. If you look in the dictionary for the definition of Opportunist you will see his face. Also next to the word awesome and the word baller as hell. Which is three words but Boba Fett doesn't play by the rules!
Monday, March 31, 2014
TIE Advanced Teardown
I have heard the opinion more than once that the TIE Advanced is the weakest ship in the game. My natural inclination is to question it and get to the bottom of why this opinion came into being.
Others have pointed out and shown that the TIE Advanced is supposed to be roughly equivalent of a X-Wing and if you judge it by its movement dial and stats to a degree it does make sense however I want to approach it from a different angle. Rather than judge it for its current inability to be used as a swarm or for any of its other perceived shortcomings I want to find some uses for it that might make you consider it in your lists.
Since it doesn't lend itself to being taken in a swarm of only TIE Advanced models I believe it's is used in more of a command ship style capacity. Almost like a support ship in a lot of ways. One way to use it that I thought of was the following for 35 points.
Maarek Steele with Cluster Missiles and Opportunist
Now Maarek seems to be a little confusing at first. This is a pilot ability that really wants to roll a lot of dice in order to insure that it has a chance to get used. Having 2 Attack dice base does not a recipe make for guaranteed crits. However his ship has a Missile Slot and with the introduction of Imperial Aces we have access to Opportunist. Suddenly he can roll a lot of dice and in this role could serve in an anti-swarm capacity.
This build could be added to a swarm list (5 Obsidian TIEs for instance) and because it is nearly the same number of hit points as another two TIEs the list doesn't lose much thanks to amount of firepower that build puts out. Also being Pilot Skill 7 doesn't hurt and if you can find 1 point you can easily add a Munitions Failsafe to insure you don't completely miss on your Cluster Missiles. I think there might be a place for running direct anti-swarm counters in a swarm list of your own.
In staying with that concept; I call this list I Have You Now! and it is 100 points.
Darth Vader with Expose and Shield Upgrade
Howlrunner with Swarm Tactics
Mauler Mithel with Swarm Tactics
x2 Academy TIE
Here we get Darth Vader who can reliably use Expose on thanks to having two actions. You can easily gain an Evade token and then use Expose so that you don't leave yourself in a vulnerable position. Vader is a bit more tanky as well thanks the addition of Shield Upgrade. Howrunner and Mauler run a mini-swarm with their own Swarm Tactics to help make sure those Academy TIEs get to fire. It is only five models but it has the hit points for six and that is pretty standard for an elite TIE swarm. Lastly you get some reliability when attacking thanks to Howlrunner and Vader potentially rolling 4 Attack
dice if he finds himself at Range 1.
I came up with another list that i've won a couple of games with that also utilizes Darth. I call it Darth's the Boss and it is 99 points.
Darth Vader with Squad Leader
Captain Jonus with Seismic Charges
x2 Gamma Squadron with Concussion Missiles
This list is designed to have an initial alpha strike with high reliability against a single target with the concussion missiles. Ideally you move the bombers up and focus, they move, you move everyone else up and use Darth to give the now in range target locks to the bombers. They then dump their missiles into a ship able to re-roll two dice out of four, change one blank to a hit and use a focus token if needed. You also have access to the Seismic Mine as well in order to help deal with swarms as well as to give you something to do it you get an ion turret. One damage is less of a big deal to a TIE bomber than it is to most other fighters. Darth is there essentially to maximize efficiency of the bombers every turn. The main downside is that the movement dial of the TIE Advanced isn't really compatible with the TIE Bombers and that you need to stay somewhat close together to take advantage of everything.
I think the TIE Advanced could use a small boost similar to the one the A-Wing is getting in Rebel Aces but I don't believe it is a bad ship. You do need to build your entire list around it but I think it could find a place for those who are looking for a bit of diversity or just thinking outside the box.
In this weeks The Wookie Won I show a list I created (that has likely been created elsewhere but it was new to me) called Synergy Smuggler for 100 points.
Dutch Vander with Blaster Turret, Hull Upgrade, and R5-D8
Garven Dreis with Hull Upgrade and R2-D2
Kyle Katarn with Blaster Turret, Hull Upgrade, Moldy Crow, and Recon Specialist
If you use this list the right way it can be surprisingly reliable. For the first two turns I only move 1 and bank focus on Kyle until we engage on Turn 3/4. Garven hangs back to jump on any ship that starts to close whereas Dutch and Kyle stay next to each other. It is pretty important to keep Garven close to the group to insure his ability works. Actions should be: Garven does Target Lock, Dutch does Target Lock and gives one to Kyle and Kyle does a Focus action. At the start of the Combat Phase Kyle gives Garven a Focus oken. At the start of the combat phase The activation order always goes: Garven attacks now having a Focus token and a Target Lock. He gives the Focus token to Dutch. Dutch attacks using his Focus and Target Lock. Then Kyle attacks with his focus and Target Lock. Ideally every turn all three ships can attack using Focus and Target Lock thus insuring that those three dice reliably put some hurt on whoever you are shooting.
Lastly a variant of the above list
Dutch Vander with Blaster Turret
Kyle Katarn with Blaster Turret, Moldy Crow, and Recon Specialist
x2 Rookie Pilots
It does seem to beef up the list in terms of raw firepower and I do like the addition of another model but you lose Garven's Focus manipulation ability.
We will return on Thursday!
Thursday, March 27, 2014
Battle Report - Imperial vs Rebel - 22 March 2014
Welcome to Rolling Blanks first battle report. Any suggestions about the format are appreciated as I am still trying to balance conciseness with readability. Also note there will be no The Wookie Won segment on battle report days.
Rebel (Will) 100 points (Won Initiative)
Ibitsam with Advanced Sensors
Dagger Squadron with Advanced Sensors
Chewbacca
Imperial (Michael) 100 points
Howlrunner with Stealth Device
Mauler Mithel
Backstabber
Dark Curse
Night Beast
Winged Gundark
Pre-Deployment Setup
Deployment


Turn 1
Movement
Dagger Squadron barrel roll then straight 3
Chewbacca straight 4 then target locked Night Beast
Winged Gundark straight 3 then focus
Night Beast straight 5 then focus
Ibitsam barrel roll the straight 3
Dark Curse straight 5 then focus
Backstabber straight 5 then focus
Mauler Mithel straight 4, hits asteroid, no damage
Howlrunner straight 3 then focus


Combat
Dark Curse @ Chewbacca [RNG 3] Roll: FF Used Focus New Result: HH
Defense Roll: E End Result: -1 Shield
Chewbacca @ Night Beast [RNG 3] Roll: FFB Used Focus New Result: HHB
Defense: EEB End Result: None
Night Beast @ Chewbacca [RNG 3] Roll: HB
Defense Roll: FB End Result -1 Shield
Backstabber @ Chewbacca [RNG 3] Roll: CF Used Focus New Result: CH
Defense Roll: EE End Result: None
Summary: Chewbacca and the trio of TIE pilots got in range early and exchanged some long range pot shots which resulted in Chewbacca losing a couple of shields.
Turn 2
(Note: We were unsure if Night Beast got his focus if he performed a green maneuver which resulted in bump but we agreed to allow it for this game.)
Movement
Dagger squadron straight 2 then focus
Chewbacca straight 2 then target locked Backstabber
Winged Gundark straight 3 then focus
Night Beast straight 2, bumps Chewbacca, gains free focus
Ibitsam focus then bank 3, stressed
Dark Curse straight 3, bumps Chewbacca
Backstabber k-turn 4, stressed
Mauler Mithel straight 2 then focus
Howlrunner straight 3, hits asteroid, critical result of Thrust Control Fire, stressed


Combat
Howlrunner @ Dagger Squadron [RNG 1] Roll: HFF Used Focus New Result: HHH
Defense Roll: E End Result: -2 Shields
Mauler Mithel @ Dagger Squadron [RNG 1] Roll: HHFB Used Howlrunner Result: HHFB Used Focus Final Result: HHHB
Defense Roll: B End Result: -3 Shields
Ibitsam @ Night Beast [RNG 3] Roll: HBB Used Ability New Result: HBB
Defense Roll: EFFB End Result: None
Backstabber @ Chewbacca [RNG 1] Roll: HHHF
Defense Roll: B End Result: -3 Shields
Chewbacca @ Backstabber [RNG 1] Roll: HHFB Used Target Lock New Result: HHBB
Defense Roll: EFB End Result: -1 Damage
Winged Gundark @ Dagger Squadron [RNG 1] Roll: HFB Used Howlrunner New Result: HFF Used Focus Final Result: HHH
Defense Roll: B End Result: -2 Damage
Dagger Squadron @ Howlrunner [RNG 1] Roll: CHHH
Defense Roll: EFFF End Result: Howlrunner Destroyed
Summary: Howlrunner, Mauler Mithel, and Winged Gundark ganged up on the Dagger Squadron
B-Wing and nearly destroyed it. In retaliation it focused it fore on Howlrunner and in
spite of the Stealth Device destroyed her in an impressive volley. Backstabber swung
around and fired at point blank range taking down Chewbacca's shields. In response the
Chewbacca fired and managed to hit Backstabber in reply.
Turn 3
Movement
Dagger Squadron focus, turn 1, stressed
Chewbacca k-turn 3, stressed
Winged Gundark k-turn 4, stressed
Night Beast k-turn 4, stressed
Ibitsam bank 1, target lock Backstabber
Dark Curse k-turn 4, stressed
Backstabber straight 2, loses stress, focus
Mauler Mithel k-turn 4, stressed


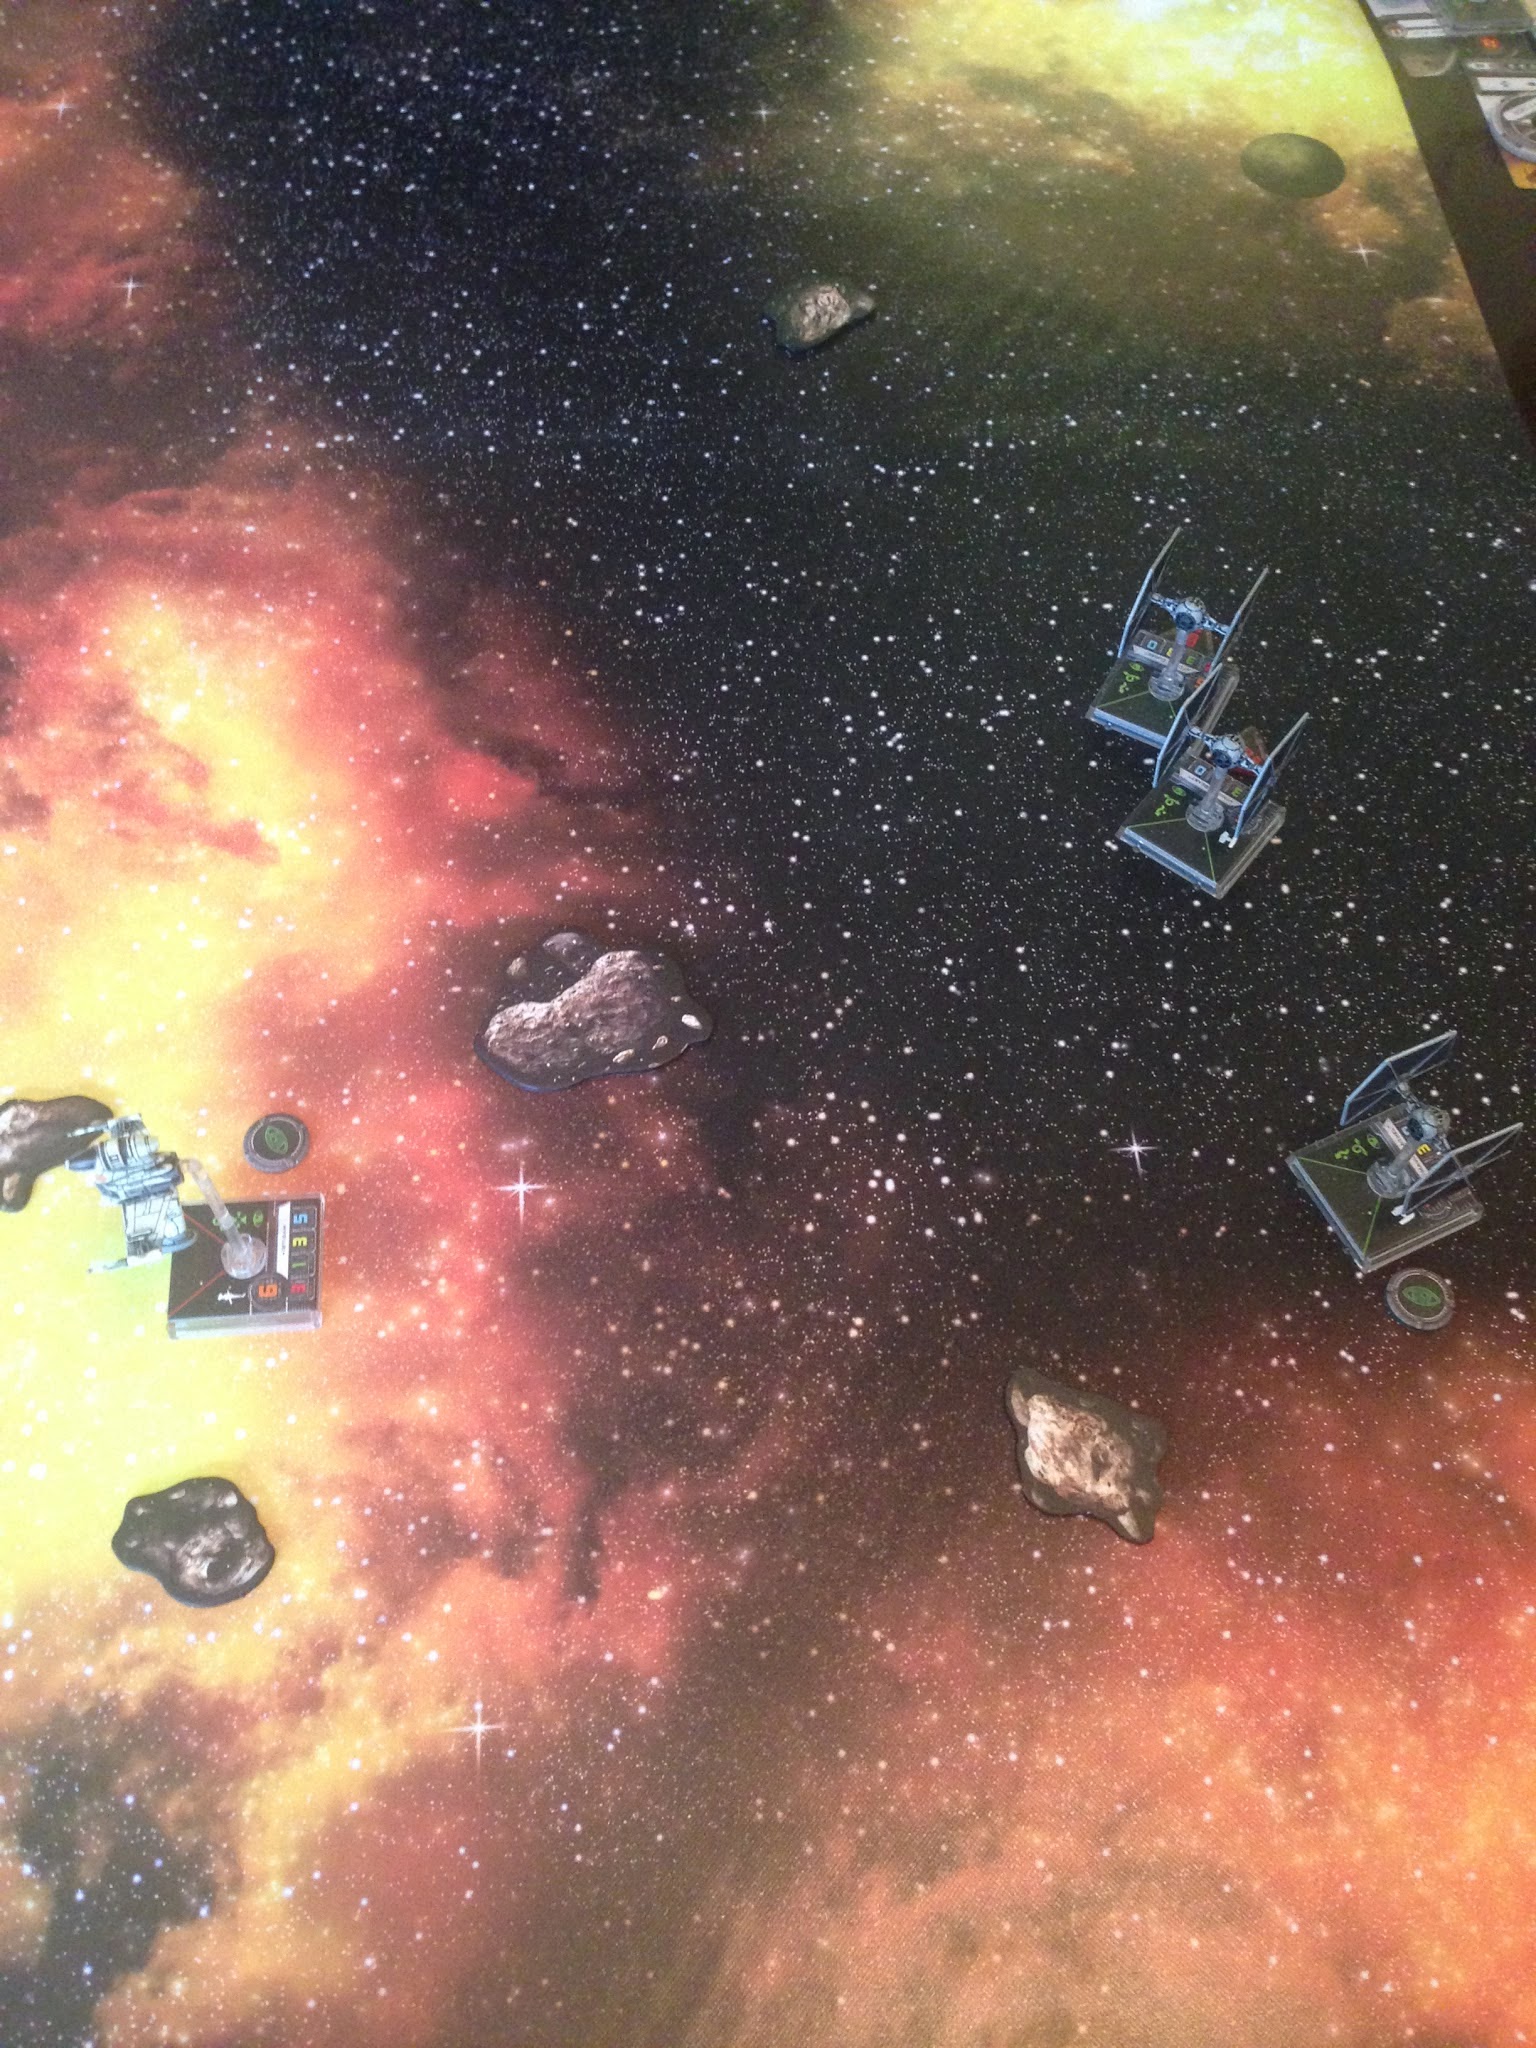


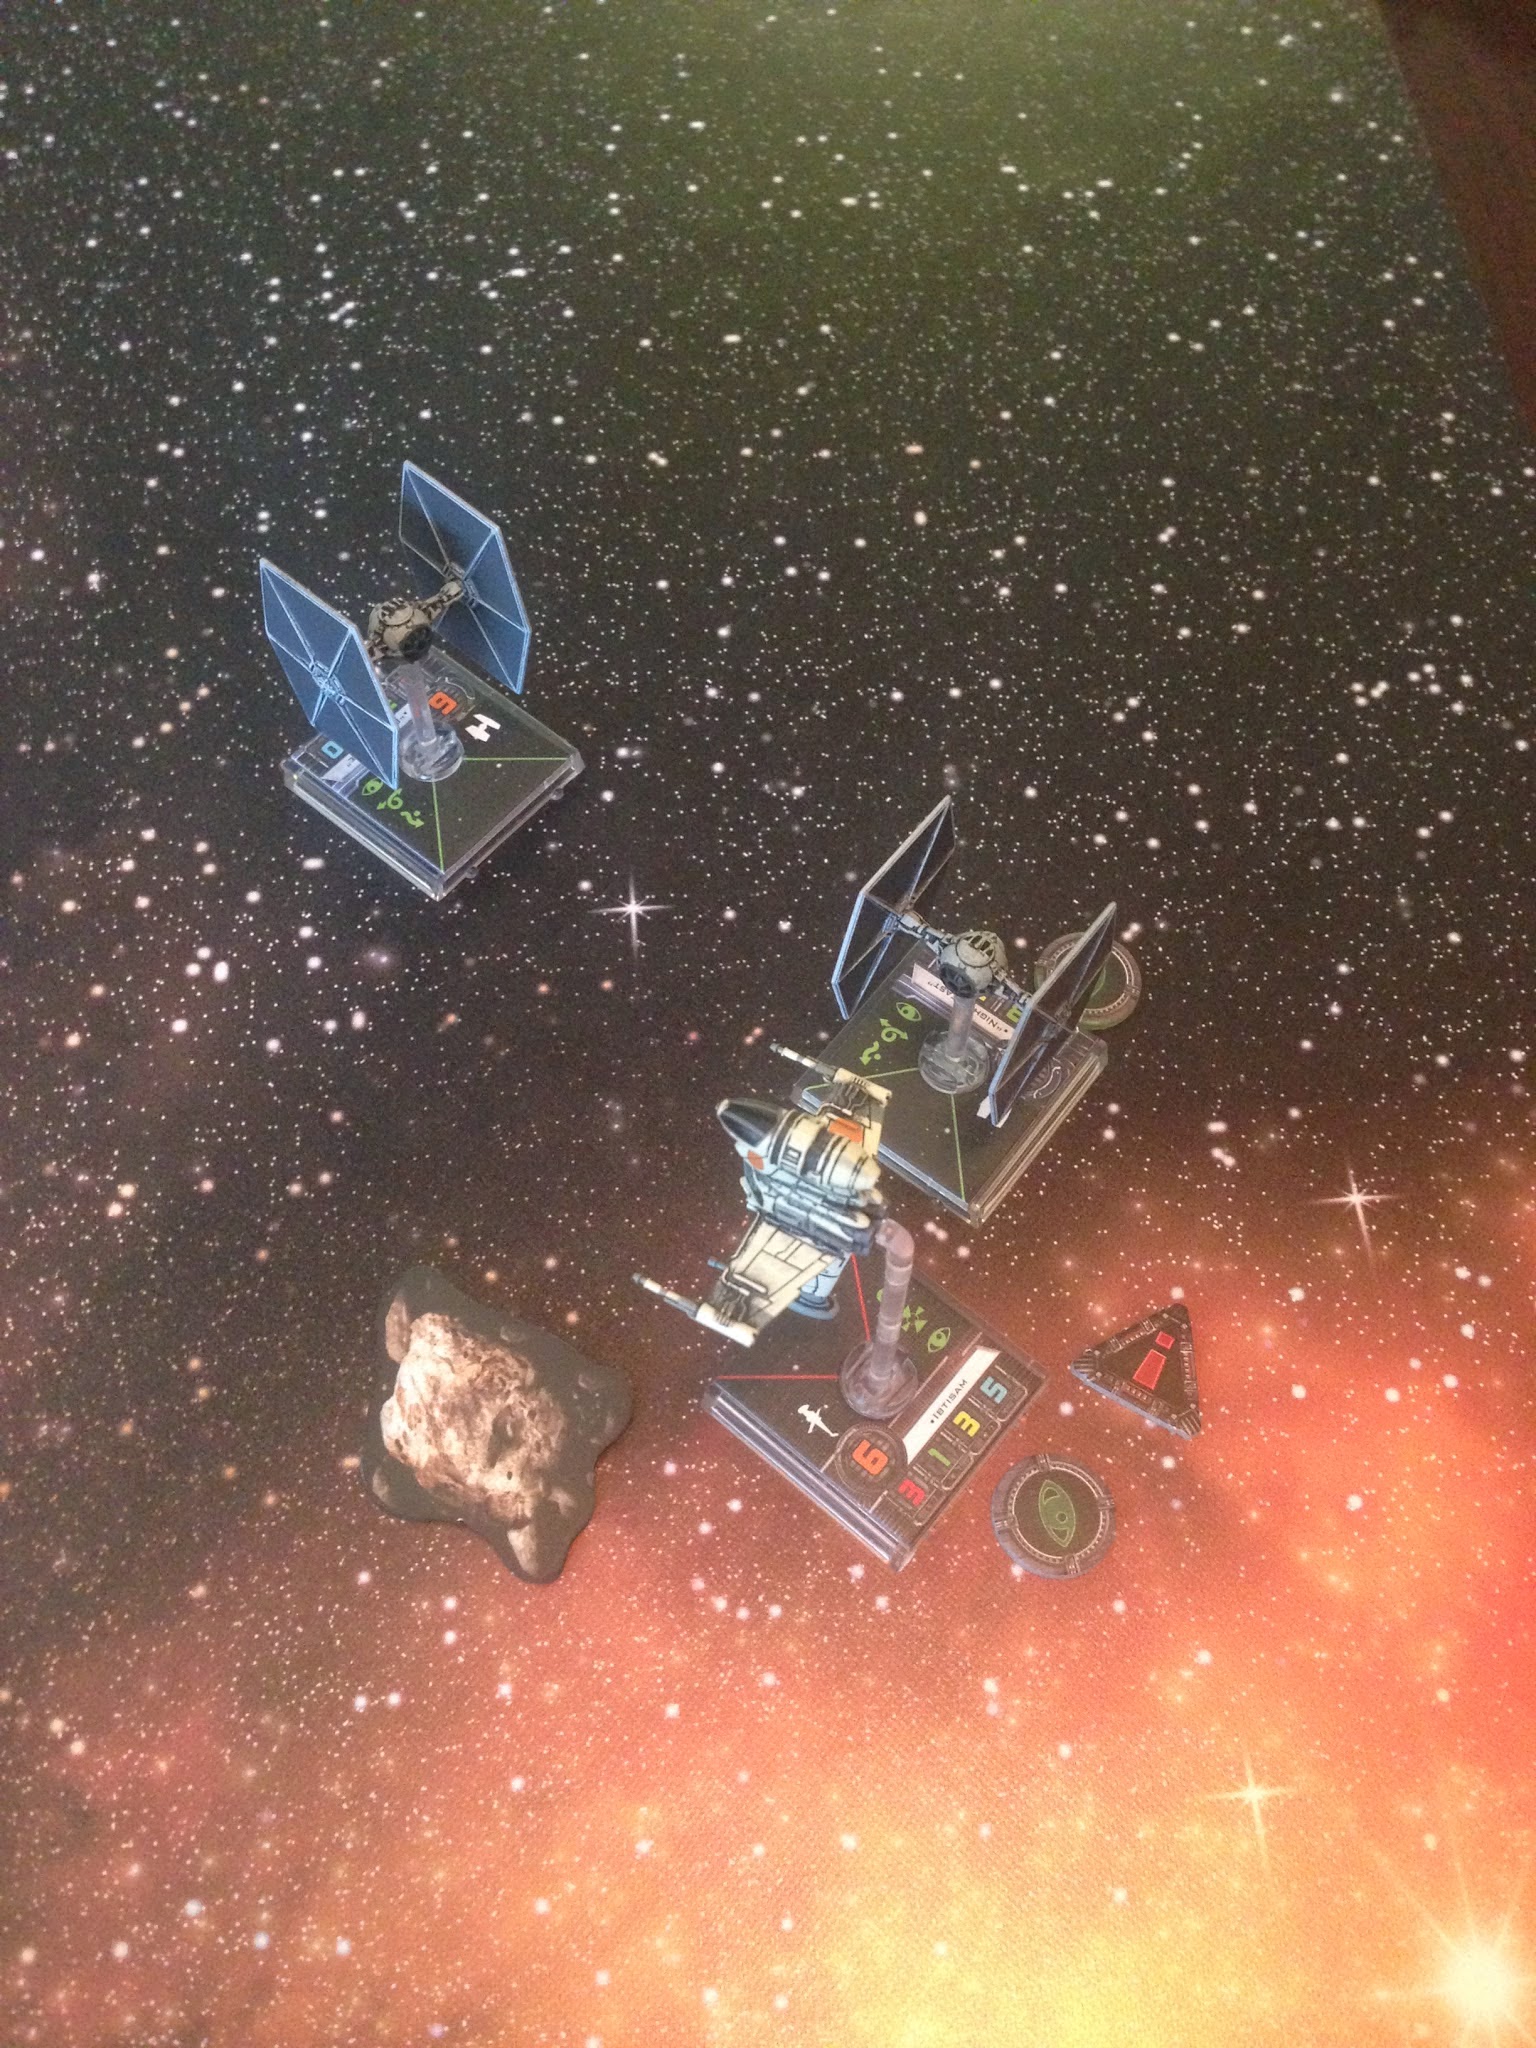
Turn 11
Movement
[NO PICTURES TAKEN]
Combat
Ibitsam @ Night Beast [RNG 3] Roll: CHF Used Focus New Result: CHH
Defense Roll: EEE End Result: None
Dark Curse @ Ibitsam [RNG 1] Roll: FFB End Result: None
Night Beast @ Ibitsam [RNG 1] Roll: CB
Defense Roll: B Used Ability: New Result: E End Result: None
Summary: Some shooting exchanged but everyone managed to avoid taking any damage.
Turn 13
Movement
Night Beast bank 2, hits asteroid, crit result of Console Fire
Ibitsam straight 2, loses stress, bump Night Beast
Dark Curse turn 1, bump Ibitsam
Combat
None
Summary: Due to a traffic jam no one was able to come to work this turn. Night Beast does manage to set his controls on fire though in the second turn of the game where only the asteroid wins.
Turn 14
Movement
Night Beast bank 2, puts out Console Fire, free focus
Ibitsam focus, turn 2
Dark Curse k-turn 3, stress token


Combat
Dark Curse @ Ibitsam [RNG 2] Roll: FB End Result: None
Summary: Night Beast manages to put out the flames and Dark Curse misses Ibitsam.
Turn 15
Movement
Night Beast turn 1, focus
Ibitsam, focus, k-turn 2, stressed
Dark Curse straight 3, loses stress, barrel roll


Combat
Ibitsam @ Night Beast [RNG 1] Roll: CFBB Used Ability: New Result: CHFB Used Focus Final Result: CHHB
Defense Roll: FFB Used Focus New Result: EEB End Result: 1 Critical, critical result of Damaged Cockpit
Dark Curse @ Ibitsam [RNG 1] Roll: HHF
Defense Roll: E End Result: -1 Shield
Night Beast @ Ibitsam [RNG 1] Roll: BBH
Defense Roll: B Used Ability New Result: B End Result: -1 Shield
Summary: Ibitsam seeing that Night Beast needs some help with his cockpit decides to fire into it causing another crit. However both TIEs managed to land a bit of damage in return whittling down Ibitsam's shielding.
Turn 16
Movement
Night Beast k-turn 3, stressed, hits asteroid, no effect
Ibitsam, bank 1, loses stress, bump Dark Curse
Dark Curse k-turn 4, stressed
[NO PICTURES TAKEN]
Combat
Dark Curse @ Ibitsam [RNG 1] Roll: CBB
Defense Roll: B Used Ability New Result: B End Result: 1 Critical, critical result of Direct Hit
Night Beast @ Ibitsam [RNG 2] Roll: FB End Result: None
Summary: Dark Curse puts the hurt on Ibitsam and manages to shoot off some important looking part. Night Beast still cant see out the windshield and misses.
Turn 17
Movement
Night Beast bank 2, loses stress, hits asteroid, no effect, bumps Ibitsam, free focus
Ibitsam focus, k-turn 2, stressed
Dark Curse straight 2, loses stress, bump Night Beast
[NO PICTURES TAKEN]
Combat
Ibitsam @ Night Beast [RNG 2] CHF Used Ability New Result: CHH
Defense Roll: EBB End Result: Night Beast Destroyed
Dark Curse @ Ibitsam [RNG 2] Roll: HH
Defense Roll: E End Result: Ibitsam Destroyed
Summary: Ibitsam finally managed to pick off Night Beast but Dark Curse never took his eye off the prize and managed to eke out a win finally destroying Ibitsam.
Imperial Wins!
So ends our first battle report. Aside from missing the picture taking step a few times I think it went well as it was a balanced game that went down to the wire. See you all next week!
Rebel (Will) 100 points (Won Initiative)
Ibitsam with Advanced Sensors
Dagger Squadron with Advanced Sensors
Chewbacca
Imperial (Michael) 100 points
Howlrunner with Stealth Device
Mauler Mithel
Backstabber
Dark Curse
Night Beast
Winged Gundark
Pre-Deployment Setup
Deployment
Turn 1
Movement
Dagger Squadron barrel roll then straight 3
Chewbacca straight 4 then target locked Night Beast
Winged Gundark straight 3 then focus
Night Beast straight 5 then focus
Ibitsam barrel roll the straight 3
Dark Curse straight 5 then focus
Backstabber straight 5 then focus
Mauler Mithel straight 4, hits asteroid, no damage
Howlrunner straight 3 then focus
Combat
Dark Curse @ Chewbacca [RNG 3] Roll: FF Used Focus New Result: HH
Defense Roll: E End Result: -1 Shield
Chewbacca @ Night Beast [RNG 3] Roll: FFB Used Focus New Result: HHB
Defense: EEB End Result: None
Night Beast @ Chewbacca [RNG 3] Roll: HB
Defense Roll: FB End Result -1 Shield
Backstabber @ Chewbacca [RNG 3] Roll: CF Used Focus New Result: CH
Defense Roll: EE End Result: None
Summary: Chewbacca and the trio of TIE pilots got in range early and exchanged some long range pot shots which resulted in Chewbacca losing a couple of shields.
Turn 2
(Note: We were unsure if Night Beast got his focus if he performed a green maneuver which resulted in bump but we agreed to allow it for this game.)
Movement
Dagger squadron straight 2 then focus
Chewbacca straight 2 then target locked Backstabber
Winged Gundark straight 3 then focus
Night Beast straight 2, bumps Chewbacca, gains free focus
Ibitsam focus then bank 3, stressed
Dark Curse straight 3, bumps Chewbacca
Backstabber k-turn 4, stressed
Mauler Mithel straight 2 then focus
Howlrunner straight 3, hits asteroid, critical result of Thrust Control Fire, stressed
Combat
Howlrunner @ Dagger Squadron [RNG 1] Roll: HFF Used Focus New Result: HHH
Defense Roll: E End Result: -2 Shields
Mauler Mithel @ Dagger Squadron [RNG 1] Roll: HHFB Used Howlrunner Result: HHFB Used Focus Final Result: HHHB
Defense Roll: B End Result: -3 Shields
Ibitsam @ Night Beast [RNG 3] Roll: HBB Used Ability New Result: HBB
Defense Roll: EFFB End Result: None
Backstabber @ Chewbacca [RNG 1] Roll: HHHF
Defense Roll: B End Result: -3 Shields
Chewbacca @ Backstabber [RNG 1] Roll: HHFB Used Target Lock New Result: HHBB
Defense Roll: EFB End Result: -1 Damage
Winged Gundark @ Dagger Squadron [RNG 1] Roll: HFB Used Howlrunner New Result: HFF Used Focus Final Result: HHH
Defense Roll: B End Result: -2 Damage
Dagger Squadron @ Howlrunner [RNG 1] Roll: CHHH
Defense Roll: EFFF End Result: Howlrunner Destroyed
Summary: Howlrunner, Mauler Mithel, and Winged Gundark ganged up on the Dagger Squadron
B-Wing and nearly destroyed it. In retaliation it focused it fore on Howlrunner and in
spite of the Stealth Device destroyed her in an impressive volley. Backstabber swung
around and fired at point blank range taking down Chewbacca's shields. In response the
Chewbacca fired and managed to hit Backstabber in reply.
Turn 3
Movement
Dagger Squadron focus, turn 1, stressed
Chewbacca k-turn 3, stressed
Winged Gundark k-turn 4, stressed
Night Beast k-turn 4, stressed
Ibitsam bank 1, target lock Backstabber
Dark Curse k-turn 4, stressed
Backstabber straight 2, loses stress, focus
Mauler Mithel k-turn 4, stressed
Combat
Mauler Mithel @ Dagger Squadron [RNG 1] Roll: CHHH
Defense Roll: E End Result: Dagger Squadron Destroyed
Ibitsam @ Backstabber [RNG 2] Roll: HHF Used Target Lock New Result: CHH
Defense Roll: EBB End Result: 1 Critical, 1 Damage, critical result of Direct Hit
Backstabber @ Chewbacca [RNG 1] CHH
Defense Roll: B End Result: 1 Critical, 2 Damage, critical result of Injured Pilot
Backstabber Destroyed
Chewbacca @ Night Beast [RNG 3] Roll: FBB End Result: None
Night Beast @ Chewbacca [RNG 3] Roll: FB End Result: None
Dark Curse @ Ibitsam [RNG 2] Roll: BB End Result: None
Winged Gundark @ Ibitsam [RNG 2] Roll: HF
Defense Roll: E End Result: None
Summary: Mauler Mithel gained vengence for the loss of Howlrunner by immediately
destroying the Dagger Squadron B-Wing. Ibitsam pursued Backstabber and destroyed him in
a single volley. However Backstabber being of equal pilot skill got to unleash one final
attack into Chewbacca doing an impressive three damage.
Turn 4
Movement
Chewbacca straight 1, loses stress, target lock Night Beast
Winged Gundark turn 2, keeps stress
Night Beast straight 2, loses stress, evade, free focus
Ibitsam barrel roll, k-turn 2, stressed
Dark Curse straight 2, focus
Mauler Mithel bank 3, keeps stress
Combat
Mauler Mithel @ Chewbacca [RNG 2] Roll: BB End Result: None
Ibitsam @ Winged Gundark [RNG 2] Roll: CHB, Used Ability, New Result: CHH
Defense Roll: FBB End Result: Winged Gundark Destroyed
Dark Curse @ Chewbacca [RNG 1] Roll: BBB End Result: None
Chewbacca @ Night Beast [RNG 1] Roll: HFFF Used Target Lock New Result: CHHF
Defense Roll: EEB Used Evade New Result: EEEB End Result: None
Night Beast @ Chewbacca [RNG 1] Roll: HBB
Defense Roll: F End Result: -1 Damage
Summary: Ibitsam now turned his attention on Winged Gundark and destroyed him before he
could get another shot off. Chewbacca went after Night Beast who barely evaded the
onslaught. In reply Night Beast shot back at Chewbacca managing to do a bit of damage.
Turn 5
Movement
Chewbacca, k-turn 4, stressed
Night Beast k-turn 3, stressed
Ibitsam turn 2, stressed
Dark Curse k-turn 3, stressed
Mauler Mithel bank 3, loses stress, hits asteroid, 1 damage
Combat
Mauler Mithel @ Ibitsam [RNG 1] Roll: HFFF
Defense Roll: F Used Ability New Result: E End Result: None
Ibitsam @ Mauler Mithel [RNG 1] Roll: CFBB, Used Ability, New Result: CHFB
Defense Roll: EEB End Result: None
Dark Curse @ Ibitsam [RNG 2] Roll: HF
Defense Roll: E End Result: None
Chewbacca @ Mauler Mithel [RNG 2] Roll: CHH
Defense Roll: EEE End Result: None
Night Beast @ Ibitsam [RNG 2] Roll: FB End Result: None
Summary: Lots of shooting and no damage. The only winner this round was the asteroid
which managed to do a bit of damage to Mauler Mithel.
Turn 6
Movement
Chewbacca, straight 2, loses stress, bumps Ibitsam
Night Beast straight 2, loses stress, evade and free focus
Ibitsam straight 2, loses stress, barrel roll
Dark Curse straight 2, loses stress, focus
Mauler Mithel bank 3, bump Dark Curse
Combat
Mauler Mithel @ Chewbacca [RNG 1] Roll: CHHB
Defense Roll: B End Result: 1 Critical, 2 Damage, critical result of Damaged Cockpit, ignored
Dark Curse @ Chewbacca [RNG 1] Roll: CCF Used Focus New Result: CCH
Defense Roll: B End Result: Chewbacca Destroyed
Summary: Mauler Mithel and Dark Curse focused on Chewbacca finally taking him down.
Turn 7
Movement
Night Beast k-turn 3, stressed
Ibitsam focus, turn 2, stressed
Dark Curse k-turn 3, stressed
Mauler Mithel turn 1, focus
Combat
None
Summary: Ibitsam flies into the asteroids to put some distance between himself and the
remainder of the TIE fighters.
Turn 8
Movement
Night Beast bank 3, keeps stress
Ibitsam straight 2, loses stress, focus
Dark Curse bank 3, stressed, bumps Night Beast
Mauler Mithel turn 1, focus
Combat
Mauler Mithel @ Ibitsam [RNG 3] Roll: BB End Result: None
Night Beast @ Ibitsam [RNG 3] Roll: FB End Result: None
Summary: A few stray potshots are taken at Ibitsam to no effect.
Turn 9
Movement
Night Beast straight 2, loses stress, evade, free focus
Ibitsam barrel roll, k-turn 2, stressed
Dark Curse bank 2, loses stress, barrel roll
Mauler Mithel bank 2, focus
Combat
Mauler Mithel @ Ibitsam [RNG 3] FB Used Focus New Result: HB
Defense Roll: EB End Result: None
Ibitsam @ Mauler Mithel [RNG 3] HHB Used Ability New Result: CHH
Defense Roll: FBBB End Result: Mauler Mithel Destroyed
Dark Curse @ Ibitsam [RNG 3] HF
Defense Roll: BB Used Ability New Result: BF End Result: -1 Shield
Summary: Mauler Mithel attempted to take a long range shot at Ibitsam who had the same
idea. Mauler completely missed whereas Ibitsam hit critically destroying Mauler Mithel.
Dark Curse also took a potshot and managed to knock down a shield.
Turn 10
Movement
Night Beast bank 2, evade, free focus
Ibitsam bank 1, barrel roll
Dark Curse focus, bank 2, bump Ibitsam
Combat
Ibitsam @ Night Beast [RNG 2] Roll: HHBB
Defense Roll: EEB End Result: None
Summary: Ibitsam tried to put the hurt on Night Beast but he managed to avoid the pain.
Turn 11
Movement
Night Beast bank 2, evade, free focus
Ibitsam bank 1, barrel roll
Dark Curse bank 2, bump Ibitsam
Combat
Night Beast @ Ibitsam [RNG 3] Roll: HB
Defense Roll: FFB Used Focus New Result: EEB End Result: None
Summary: A wild shot is easily dodged by Ibitsam.
Turn 12
Movement
Combat
Night Beast @ Ibitsam [RNG 3] Roll: HB
Defense Roll: FFB Used Focus New Result: EEB End Result: None
Summary: A wild shot is easily dodged by Ibitsam.
Turn 12
Movement
Night Beast bank 3, bump Dark Curse, free focus
Ibitsam focus, k-turn 2, stressed
Dark Curse bank 2, barrel roll
Combat
Ibitsam @ Night Beast [RNG 3] Roll: CHF Used Focus New Result: CHH
Defense Roll: EEE End Result: None
Dark Curse @ Ibitsam [RNG 1] Roll: FFB End Result: None
Night Beast @ Ibitsam [RNG 1] Roll: CB
Defense Roll: B Used Ability: New Result: E End Result: None
Summary: Some shooting exchanged but everyone managed to avoid taking any damage.
Turn 13
Movement
Night Beast bank 2, hits asteroid, crit result of Console Fire
Ibitsam straight 2, loses stress, bump Night Beast
Dark Curse turn 1, bump Ibitsam
Combat
None
Summary: Due to a traffic jam no one was able to come to work this turn. Night Beast does manage to set his controls on fire though in the second turn of the game where only the asteroid wins.
Turn 14
Movement
Night Beast bank 2, puts out Console Fire, free focus
Ibitsam focus, turn 2
Dark Curse k-turn 3, stress token
Combat
Dark Curse @ Ibitsam [RNG 2] Roll: FB End Result: None
Summary: Night Beast manages to put out the flames and Dark Curse misses Ibitsam.
Turn 15
Movement
Night Beast turn 1, focus
Ibitsam, focus, k-turn 2, stressed
Dark Curse straight 3, loses stress, barrel roll
Combat
Ibitsam @ Night Beast [RNG 1] Roll: CFBB Used Ability: New Result: CHFB Used Focus Final Result: CHHB
Defense Roll: FFB Used Focus New Result: EEB End Result: 1 Critical, critical result of Damaged Cockpit
Dark Curse @ Ibitsam [RNG 1] Roll: HHF
Defense Roll: E End Result: -1 Shield
Night Beast @ Ibitsam [RNG 1] Roll: BBH
Defense Roll: B Used Ability New Result: B End Result: -1 Shield
Summary: Ibitsam seeing that Night Beast needs some help with his cockpit decides to fire into it causing another crit. However both TIEs managed to land a bit of damage in return whittling down Ibitsam's shielding.
Turn 16
Movement
Night Beast k-turn 3, stressed, hits asteroid, no effect
Ibitsam, bank 1, loses stress, bump Dark Curse
Dark Curse k-turn 4, stressed
Combat
Dark Curse @ Ibitsam [RNG 1] Roll: CBB
Defense Roll: B Used Ability New Result: B End Result: 1 Critical, critical result of Direct Hit
Night Beast @ Ibitsam [RNG 2] Roll: FB End Result: None
Summary: Dark Curse puts the hurt on Ibitsam and manages to shoot off some important looking part. Night Beast still cant see out the windshield and misses.
Turn 17
Movement
Night Beast bank 2, loses stress, hits asteroid, no effect, bumps Ibitsam, free focus
Ibitsam focus, k-turn 2, stressed
Dark Curse straight 2, loses stress, bump Night Beast
[NO PICTURES TAKEN]
Combat
Ibitsam @ Night Beast [RNG 2] CHF Used Ability New Result: CHH
Defense Roll: EBB End Result: Night Beast Destroyed
Dark Curse @ Ibitsam [RNG 2] Roll: HH
Defense Roll: E End Result: Ibitsam Destroyed
Summary: Ibitsam finally managed to pick off Night Beast but Dark Curse never took his eye off the prize and managed to eke out a win finally destroying Ibitsam.
Imperial Wins!
So ends our first battle report. Aside from missing the picture taking step a few times I think it went well as it was a balanced game that went down to the wire. See you all next week!
Subscribe to:
Comments (Atom)